Introduction
In this blog I’m going to describe the end-to-end process of managing events using the tools in Power Platform.
What I mean by an “event” is not some SharePoint or Exchange Online jargon, I mean an actual event, such as a seminar, a training event or similar, for which the attendees aren’t necessarily members of your organisation (in terms of Active Directory user objects).
There are lots of ways to skin the same cat, as it were, and this is just one of them. In my example the events are training events. The attendees of the training events are members of a search and rescue volunteer organisation.
I don’t claim to have the best ideas and others may disagree with the way I’ve done things below (or at least have a cleaner or more robust way of achieving the same result), and if that’s true then I sincerely invite comments at the bottom because we’re all always learning and I’m all for it.
The Brief
Attendance to training events is not compulsory but encouraged and it’s considered poor form to not respond at all with a yes or no answer for each event. Therefore, all the necessary info must be in the initial notification email. It has to be very easy for people to respond to an event, change their response later if required and the group training officer needs a way of tracking attendance and response rates.
What I wanted to deliver was a Power App for the group training officer to use, where he or she can add a new training event with all the relevant details, and elect to send out an email to the members with all that on it.
The relevant details include the name of the event, a longer description, the start and end date/time, a location (street address or point of interest) and/or grid coordinates and a map.
In addition to all that, the email should contain a way for the recipient to respond to the event without the group training officer having to do anything.
The GTO should be able to see who has responded Yes to the event, who has responded No and who hasn’t responded at all.
Non-responders should receive follow-up reminders at regular intervals once an event email has gone out, that stop at or before the time the training event starts and the GTO should have the ability to send a follow-up email to the attendees if anything changes, such as the location, start time or a cancellation. These features are not implemented yet, nor will they contain any techniques that aren’t already covered below.
Lastly, the GTO needs a mobile app that works offline, which is used at the start of the event to check the attendees off the list. I’m not covering this off here for now either, mainly because I haven’t developed it yet, but when I do, I’ll update the blog. If you’re reading this way past the published date feel free to ping me about it, I might just forget!
In my case, the membership list is relatively fixed. Obviously members can join and members can leave, but we don’t need the ability to create a new attendee we’ve never seen before on the fly. It would be trivial to do so (compared with the rest of the below), but I’m not going to cover it.
The execution
So, for all of the above I decided on using SharePoint as my data source, Power Apps for the front-end (two apps, a web app for use on a PC and a mobile app for sign-in at the event itself), Power Automate for a Power Apps integrated flow and Logic Apps for the heavy lifting part of the automation.
SharePoint
I set up two SP lists; Training Schedule and Members.
The members list is just a list of members where the Title column is their full name and another column holds the email address. There are other columns but they’re not relevant for the training events.
The Training Schedule list has columns for all the info described above, Attendees (multi-line of text), Non Attendees (multi line of text) one I’ve called sendEmail (single line of text default “No”) and emailSent (single line of text default “No”).
Attendees and Non Attendees are going to contain comma separated lists of names of the responders, with their name in the respective column for the response. Non-responders are not recorded in the Training Schedule item in any way.

Power Apps
Adding a Training
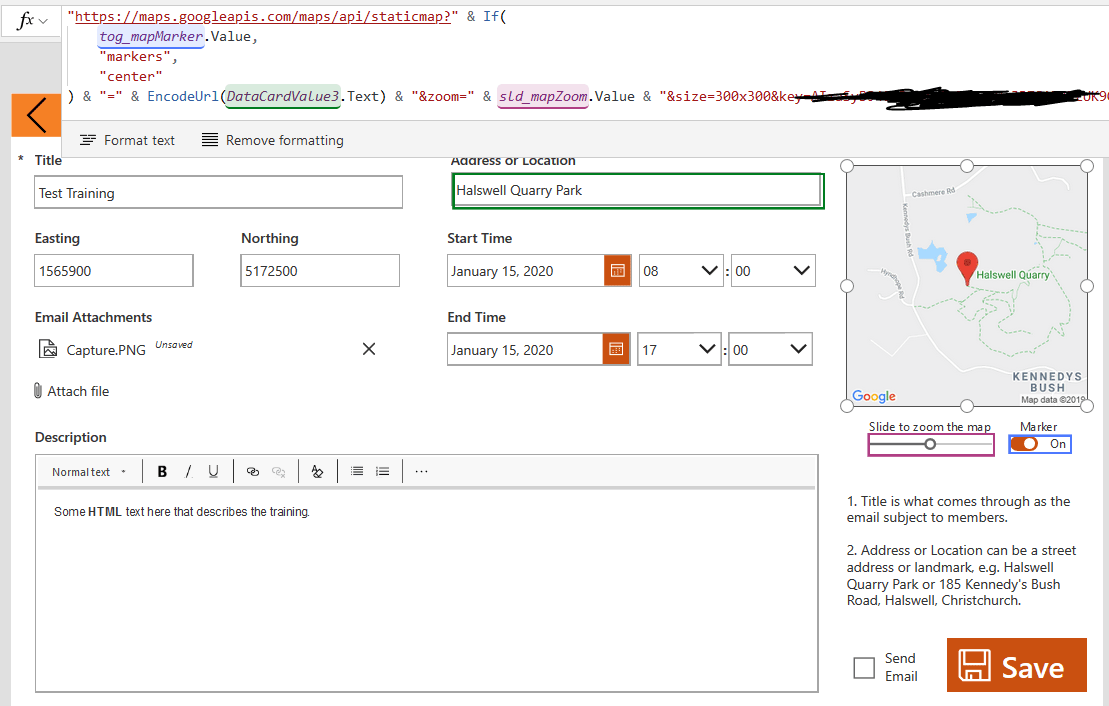
To add a new training event, the operator simply fills in a basic Power Apps form. There’s nothing remarkable about this at all. Clicking Send Email sets the value of the sendEmail column to Yes, and there’s another hidden data card for the static maps URI. The NZGD2000 coordinates are manually typed. I’d love to use a Geocoding API to get those and if a static maps service for NZ Topo maps existed that would be amazing, but on both counts it’s in the too hard or too expensive baskets (this has to be pretty much free and not take up all my free time!).
In the gallery screen, we have a list of training events on the left and a series of galleries on the right.
Viewing Attendees
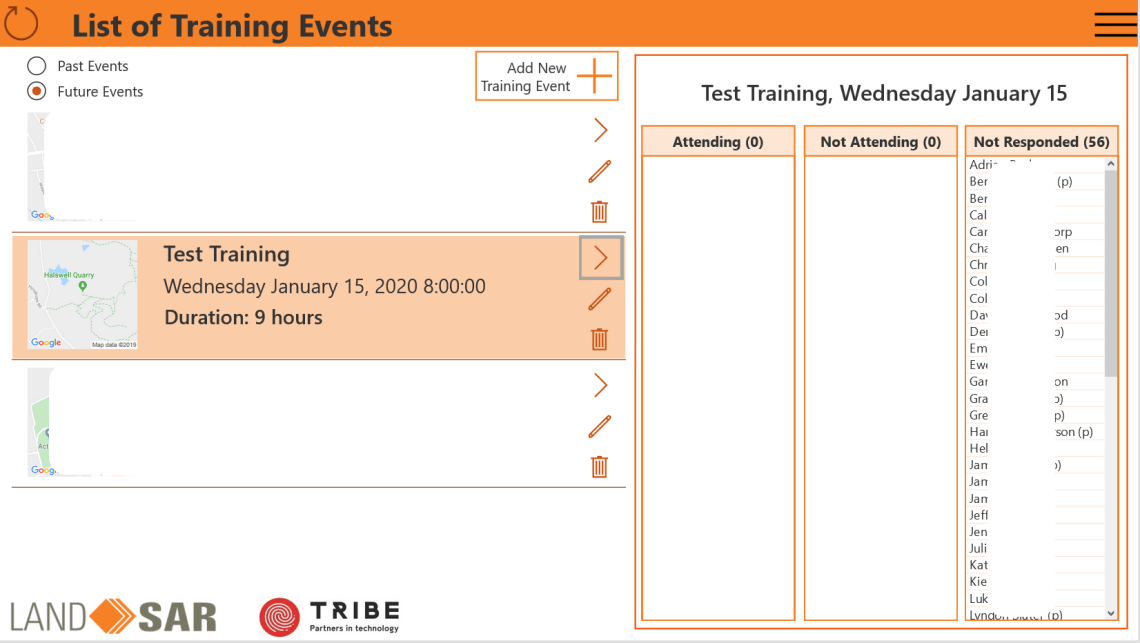
When a training event is selected, we need to show the contents of those Attendees and Non-Attendees columns.
The simplest way to do that would be to just use the Split() function to split the contents of the column to show the names, but I didn’t want to do that. I want the attendees and non-attendees as a subsets of the Members list. The reason will become apparent later.
So, in the OnSelect property of the gallery I build a collection like this:
ClearCollect(
    col_attendees,
    AddColumns(
        'Members',
        "Attending",
        Title in ThisItem.Attendees,
        "NotAttending",
        Title in ThisItem.'Non Attendees'
    )
)
What’s happening here is I’m adding the Members list to a collection with two extra columns, “Attending” and “NotAttending” which are boolean for whether they are attending, or indeed not attending. For each record in the table, the formula in AddColumns returns true for each item in the Members list if the Title column of the record exists in the Attendees string or Non Attendees string. It pains me to use the in operator because it’s not delegable, but here we are working in a collection so delegation is not a factor.
The gallery for Attendees is basically the Membership list filtered by the new Attending column:
SortByColumns(
    Filter(
        col_attendees,
        Attending
    ),
    "Title",
    Ascending
)
The gallery for Non Attendees is very similar, and you may have noticed in the screen shot above the count of the galleries is in the title. That’s quite easy to do:
"Attending ("&CountRows(gal_attending.AllItems)&")"
But what about the Not Responded gallery? We’ll that’s pretty simple too:
SortByColumns(
    Filter(
        col_attendees,
        !Attending && !NotAttending
    ),
    "Title",
    Ascending
)
Updating Attendees
So that’s all well and good, but what if we want the operator to change someone’s status. We can certainly provide nice easy buttons for people to click on in an email, but someone might just reply to the email or phone the GTO, or someone might be incapacitated in some way. There are heaps of reasons why we can’t rely on HTML buttons and we need the provision to manage that.
The way I’ve got around this problem is provide a “contact card” that shows the selected member’s details from the Membership list when their name is clicked in either of the 3 galleries on the screen. There’s a simple context variable that makes it visible on the OnSelect action of the controls in the galleries:
ClearCollect(
    col_selectedMember,
    ThisItem
);
UpdateContext({con_showMember: true})
The Default property of that toggle:
First(col_selectedMember).Attending
So we can show the selected member’s attendance for that training event, but we need to be able to change it too.
I don’t like the Patch() function when applied directly to a SharePoint data source. While there might be a clean workaround (I’d love to know) I find ETAG Version Mismatch runtime errors abound. Version Number is available in the SP list table, so maybe some logic can be applied using that, but my own experience dictates the way to go is using a Flow to update the item.
My theory is the SharePoint Update Item action in Power Automate actually includes a GET of the current item from the API then sends an HTTP PATCH request, which includes the @odata.etag value from the GET that just happened, because you never have this problem in a Flow when using the native SharePoint connector. I might be wrong about the why, but anyway, use Flow.
This is the OnSelect property of the toggle control:
UpdateContext({con_startTimer: true});
Refresh('Training Schedule');
ClearCollect(
    col_attendees,
    AddColumns(
        'Training Members',
        "Attending",
        Title in gal_trainingEvents.Selected.Attendees,
        "NotAttending",
        Title in gal_trainingEvents.Selected.'Non Attendees'
    )
);
Patch(
    col_attendees,
    LookUp(
        col_attendees,
        ID = First(col_selectedMember).ID
    ),
    {
        Attending: tog_attendanceSwitch.Value,
        NotAttending: !tog_attendanceSwitch.Value
    }
);
UpdateContext(
    {
        con_attendingString: Left(
            Concat(
                gal_attending.AllItems,
                Title & ","
            ),
            Len(
                Concat(
                    gal_attending.AllItems,
                    Title & ","
                )
            ) - 1
        )
    }
);
UpdateContext(
    {
        con_nonAttendingString: Left(
            Concat(
                gal_notAttending.AllItems,
                Title & ","
            ),
            Len(
                Concat(
                    gal_notAttending.AllItems,
                    Title & ","
                )
            ) - 1
        )
    }
);
UpdateTrainingAttendance.Run(
    con_attendingString,
    con_nonAttendingString,
    gal_trainingEvents.Selected.ID
)
startTimer is simply a variable that starts a timer which makes the DisplayMode of the toggle Disabled for a few seconds while it runs, to prevent the operator hitting the toggle twice in immediate succession and causing a race condition. I guess I could update a context variable with UpdateTrainingAttendance.Run and have the Flow return a value to switch the DisplayMode back to Edit, and that would be neat, but in this case I just used a timer.
Next I want to refresh the Training Schedule list, then build the collection again with the Attending and NotAttending boolean columns. The reason for these steps is to minimise the chance of data loss if someone responds to the training event while an operator is working in this app. We need to refresh the data source and rebuild the collection immediately before updating it so we capture any responses received since opening the app. There’s still a chance of a race condition if the two things happen at exactly the same time, but it’s highly unlikely. I sometimes think about disasters like Chernobyl in these situations though; what’s highly unlikely is guaranteed given enough time, but my assessment of the probability and the consequences concludes I’m going to take the risk here.
Anyway, what’s happens next is the record in col_attendees that matches the first (and only) record in col_selectedMember (which we collected with the OnSelect in one of the three galleries on the right of the screen) is being patched with updated values for the two aforementioned boolean columns. In short we’re updating the local collection that’s being displayed in those three galleries.
Lastly we need to update the actual data source itself. We do this by joining the array of attendees and non-attendees from the two galleries into comma separated lists as string variables then sending them to a Flow.
As an aside, being able to use galleries as data sources is a feature of Power Apps I think is pure gold. I’m not a programmer so I have no frame of reference in terms of other platforms and languages, so maybe something like this is industry standard, but the fact a gallery; the result of the Items formula plus all the controls you put in there and the outputs of the formulas in any of the properties of the controls are all available to you as the data source gallery.AllItems is an amazing feature. I take advantage of it all the time.
What I’m doing here is joining the Title properties of the items in the galleries with Concat() and doing a bit of string jiggery pokery with Left() and Len() to avoid the trailing comma. These go into a couple of context variables then get used as the inputs to a Flow
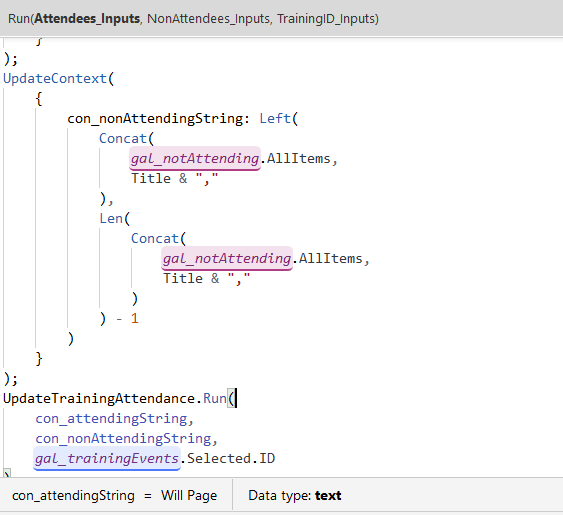
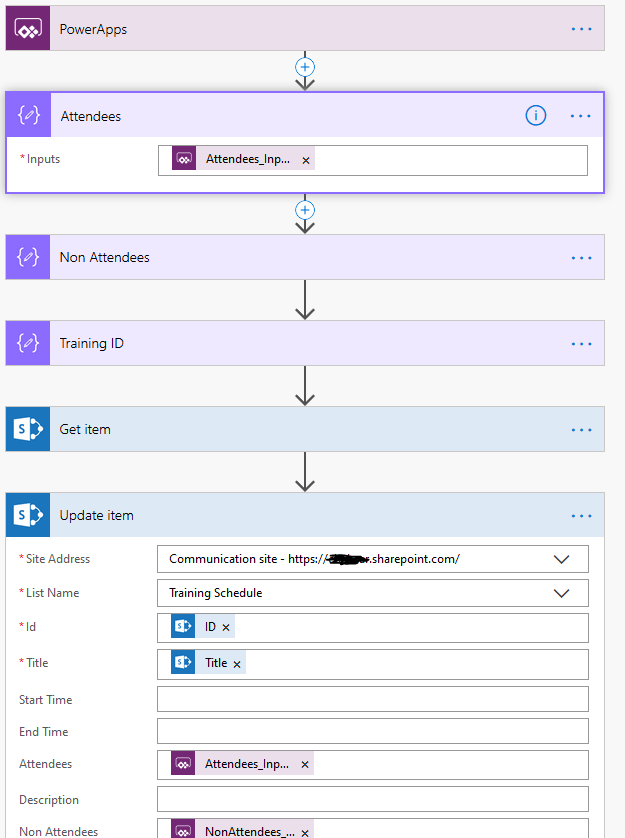
The Flow is very simple. Collect the inputs in Compose actions (just to keep the names of the inputs simple), get the item (for the Title, because it’s required in the next action) and then update item. I could grab the Title from the app and avoid the Get Item, but what’s a few milliseconds between friends?
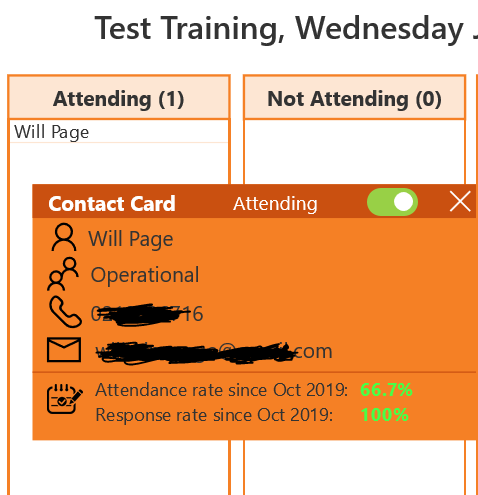
Tracking Attendance and Response Rates
The last thing in Power Apps, before I move into the Flows is the attendance rates. You might have spotted those in the contact card screen shot above.
Attendance rate label’s Text property:
Text(
    CountIf(
        Filter(
            'Training Schedule',
            'End Time' < Now()
        ),
        First(col_selectedMember).Title in Attendees
    ) / CountIf(
        'Training Schedule',
        'End Time' < Now()
    ) * 100,
    "[$-en-US]0%"
)
Its Color property:
If(Value(lbl_attendanceRate.Text) >= .5, RGBA(71,255,71,1), RGBA(255,51,51,1))
Similar story with the response rate, while it’s expected that people will respond to future events, only the response rate for past events is shown.
Text(
    CountIf(
        Filter(
            'Training Schedule',
            'End Time' < Now()
        ),
        First(col_selectedMember).Title in Attendees || First(col_selectedMember).Title in 'Non Attendees'
    ) / CountIf(
        'Training Schedule',
        'End Time' < Now()
    ) * 100,
    "[$-en-US]0%"
)
Power Apps Conclusion
So that’s the Power App. I’ve shown how the Training event is created, how the responses are displayed and changed and finally how to show the statistics for each member.
It’s not a perfect solution. I think I would be better off when updating someone’s attendance just to send the Flow their name and a boolean (attending or not), rather than complete comma separated strings of attendees and non-attendees, and let the flow sort it out using the technique described in my previous blog post. I felt at the time when I developed this, that I wanted to keep the flow that updates the training event simple and fast (milliseconds), but on reflection there’s no real reason it needs to be. Anyway, it is what it is and I’m not refactoring it now!
Logic Apps
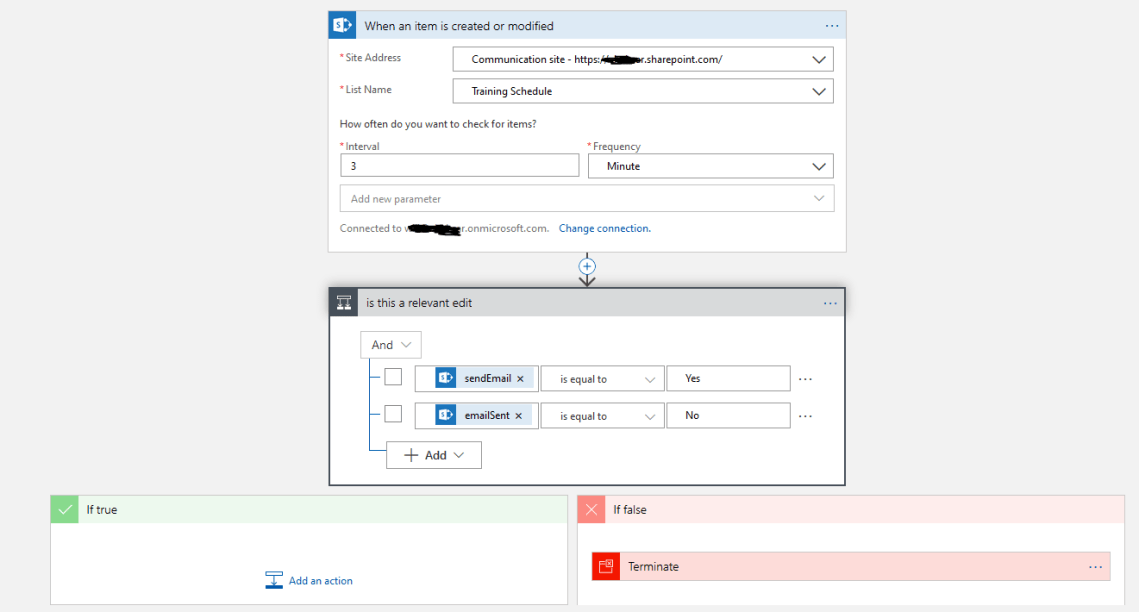
When the GTO clicks Send Email, the Default property of a hidden data card (sendEmail) is set to Yes. A Logic App is triggered when an item is created or modified and immediately runs a condition on sendEmail = “Yes” and emailSent = “No”. If that condition doesn’t match the Logic App terminates.
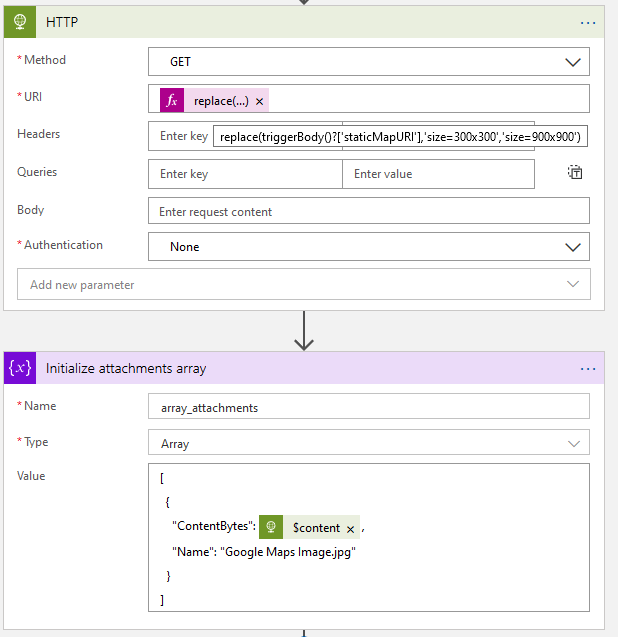
The reason this is a Logic App rather than a Flow, is because I use the HTTP action to get a static map from Google Maps Static API. That puts the Flow into premium territory, which will immediately cost us NZ$22 a month, even if there are no runs of the flow. Logic Apps, on the other hand, costs a tiny fraction of that for the amount of runs we will consume across all the stages of this workflow (and that includes the call-out system too, which works in a very similar way). If anyone from Microsoft ever reads this, who has some insight into the decision making behind the recent licensing changes in the Power Platform, please tell me why they made pretty much exactly the same product so much more expensive under the “Power Platform” branding. The old $5 a month Flow Plan 1 would have been fine for this, but anyway, hands off Logic Apps pricing please.
Notification Email Flow

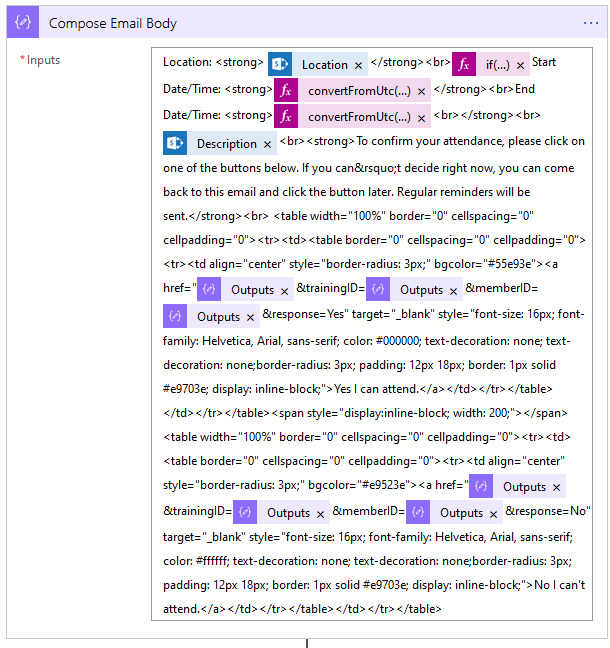
This HTML contains a table which is being used to make buttons. I used this excellent resource, so thank you so much to Jason Rodriguez.
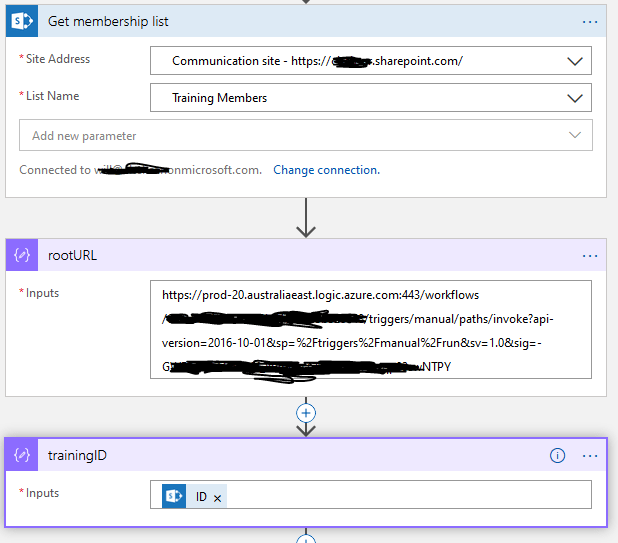
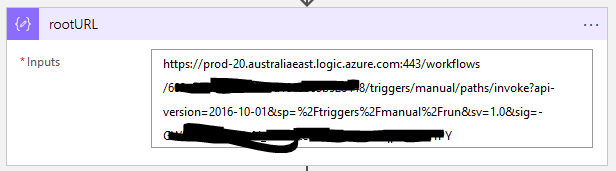
Each button is basically the same; an <a href= > to that Logic App trigger, with some query strings attached that contain the SP List ID of the training event, the SP List ID of the current member in the loop, and the response, Yes or No. To construct the hyperlink destination, take the root URL (the base trigger for the next Flow) and append some query strings on.
If you look carefully at the root URL, it actually already has some query strings, we we don’t start with ?property=value, our queries are all preceded by an ampersand, e.g. &property=value.
In my case it’s https://logic.app.trigger.url?somequery=something&trainingID=@{outputs(‘trainingID’)}&memberID=@{outputs(‘memberID’)}&response=Yes for the Yes response button and the same but No at the end for the No response button.
Each member gets one of these emails and the hyperlink target in their individual email has a unique query string that indicates their own SP list ID, so when they click on the button, the Logic App that it triggers can gather that query value and use it to update the training event record accordingly.
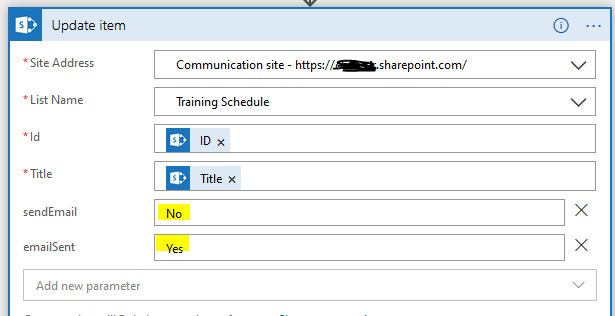
Lastly, update the trigger item to stop it sending another email:
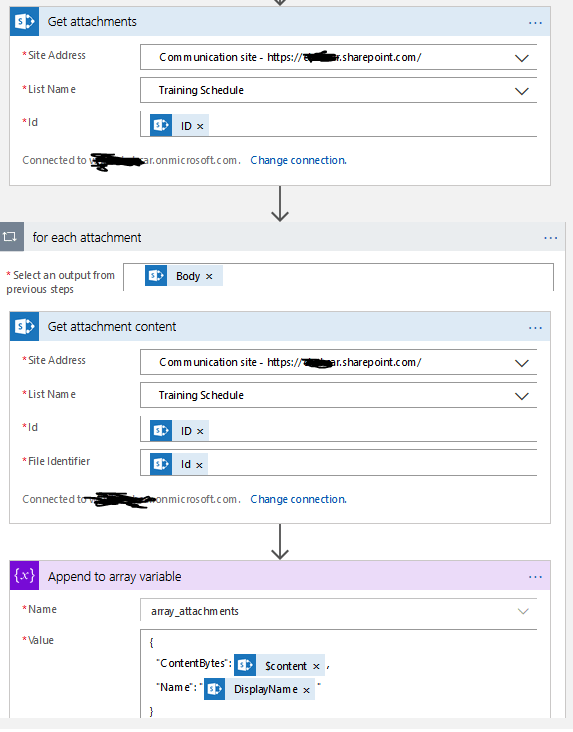
Collecting the Responses
Now we need to handle how to process the response when someone clicks on one of the buttons in the email.
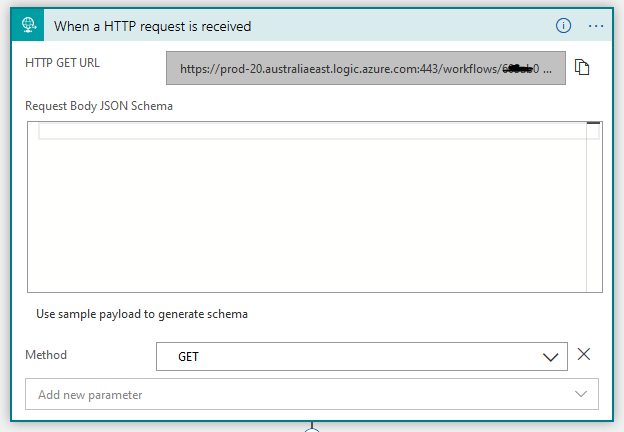
For this we use another Logic App, which is triggered When an HTTP request is received. The trigger URL is used in the Logic App above, so this actually needs to be set up first, at least as far as creating the trigger and saving the Logic App or Flow so you can copy down the trigger URL.
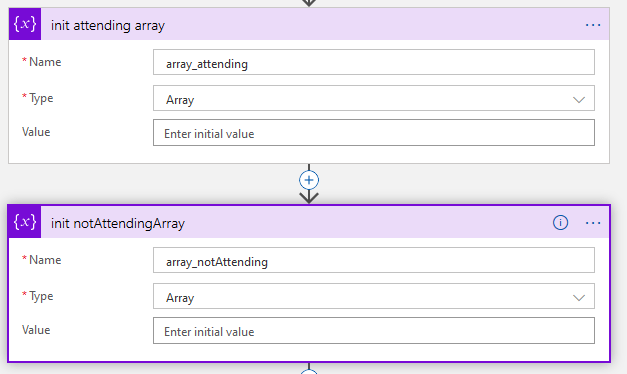
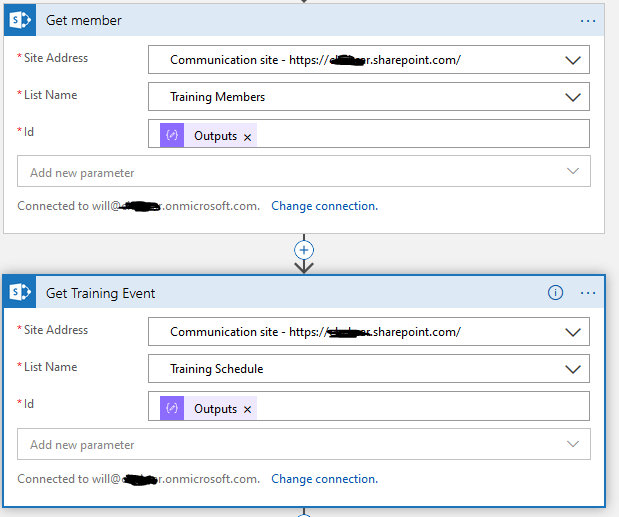
Next, set the value of the variables as follows:
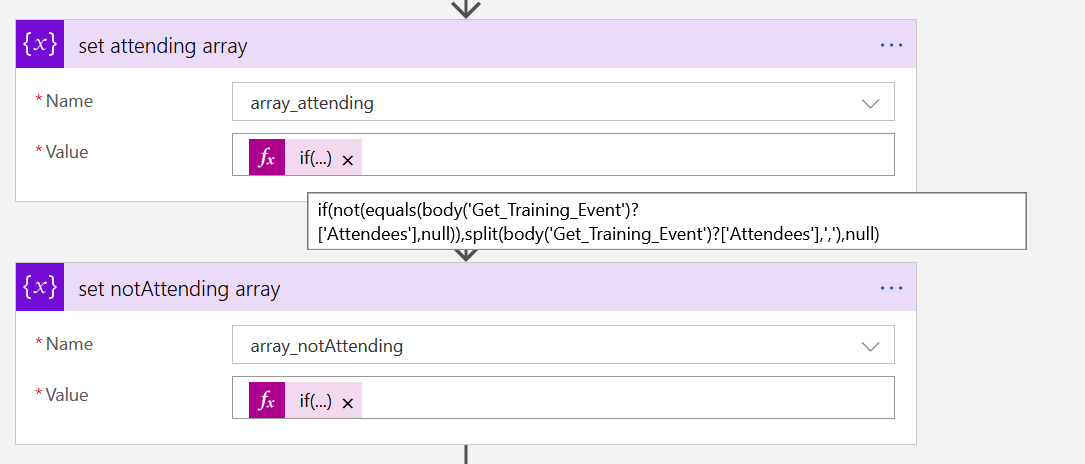
The formulae take the existing comma separated lists of names from each of the two string columns and turn them into arrays. If it wasn’t for the fact that a null input into the split() function sends it into a spin the expression would be much simpler.
If the contents of the Attendees column is not null then split the Attendees column on the comma (split() outputs an array). If it is null then return null (the array remains empty).
We now have our existing Attendees and Non Attendees in two arrays.
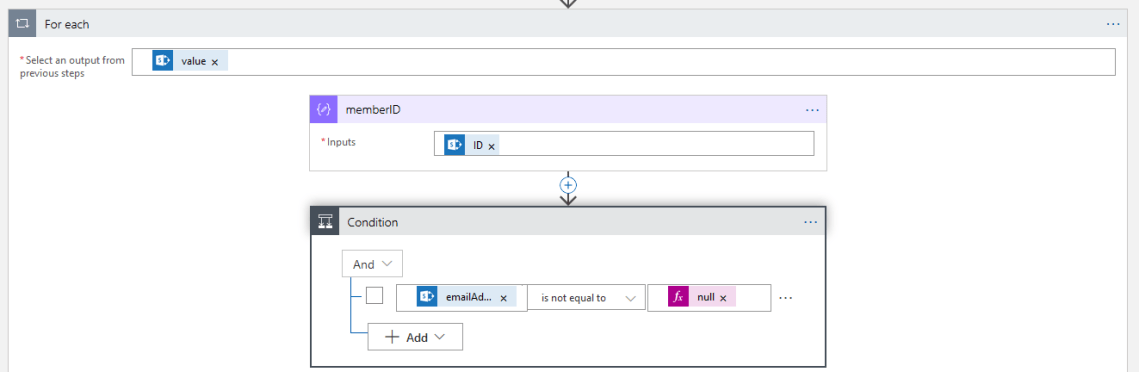
Now we need to filter those arrays for the person who has responded using Filter array:
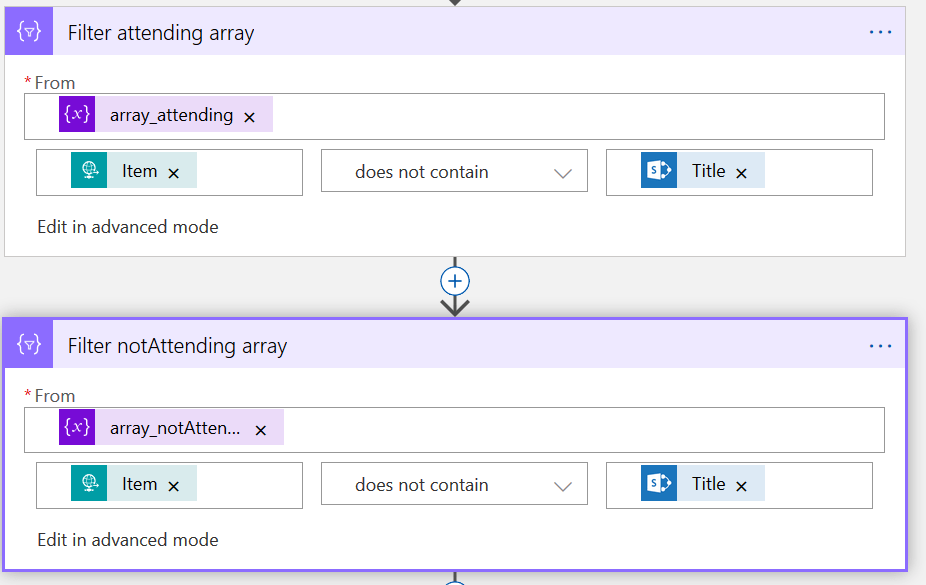
Here we’re filtering out the responder, but only including items (Item), in the array that do not contain the name of the person. Title is the Title of the SP list item from the Get Member action earlier. In my list Title contains the person’s name.
We now have the two arrays stripped of any mention of our loyal member, whether they were already in either of those comma separated text columns or not.
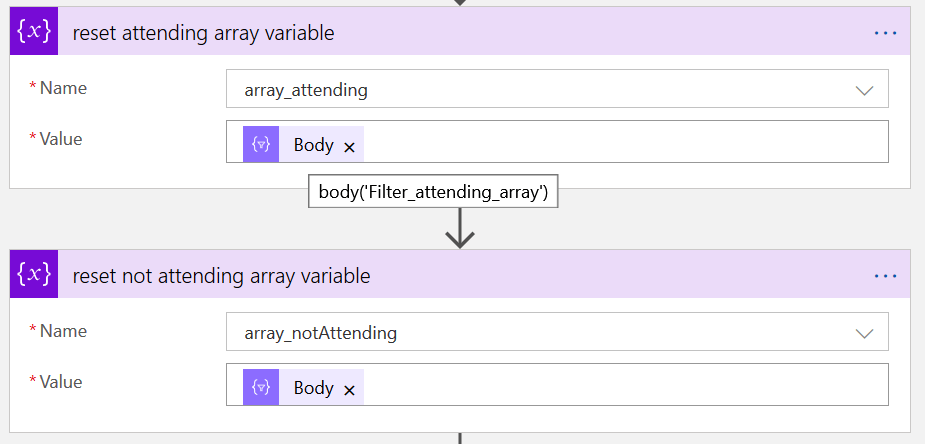
Now, overwrite the contents of those two array variables from earlier with the outputs of the Filter array actions above, using Set variable actions:
At this point in the Flow we need to know whether the person is attending or not attending. I have the response (Yes or No) in a compose action, so I run a Condition on that:
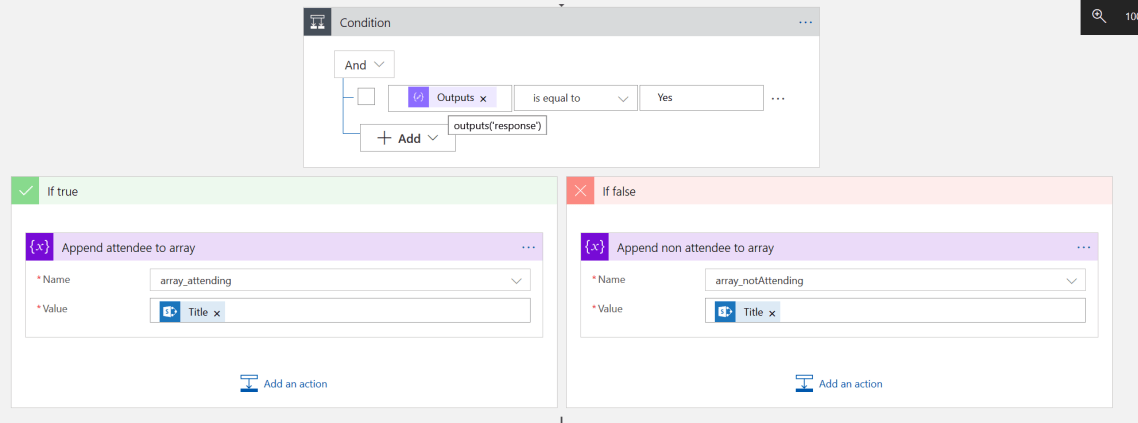
If the response is Yes, then the condition matches True, and the name of the person is added to the attending array using the Append to array variable action.
If the response isn’t Yes, then we Append to array variable, but to the non-attending array.
Now to finish off, we turn these two arrays back into comma separated strings with the Join action, which is one of the data operations:

We update our SP list item with the two strings, the outputs from the two Join actions:

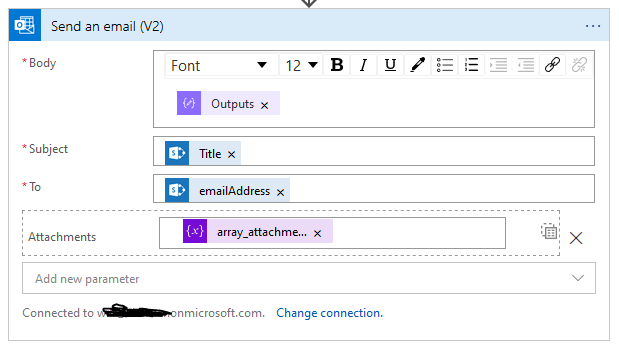
That’s great, the training event has been updated with the member’s response, but how do we tell them it worked?
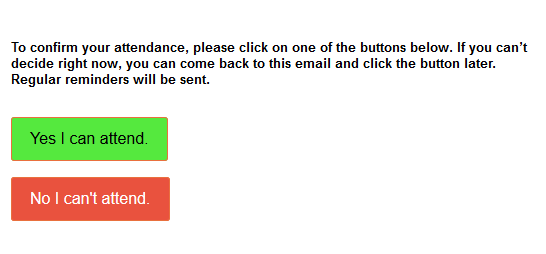
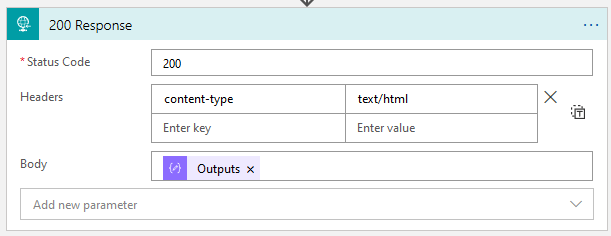
That’s easy – we use the Respond action to return a status code and some content back to the web browser that made the request in the first place. I also want to give them the ability to change their response (they could have clicked the wrong one)

The If() statement after You are registered as returns “attending” or “not attending” according to the person’s response.
This is what the browser looks like.
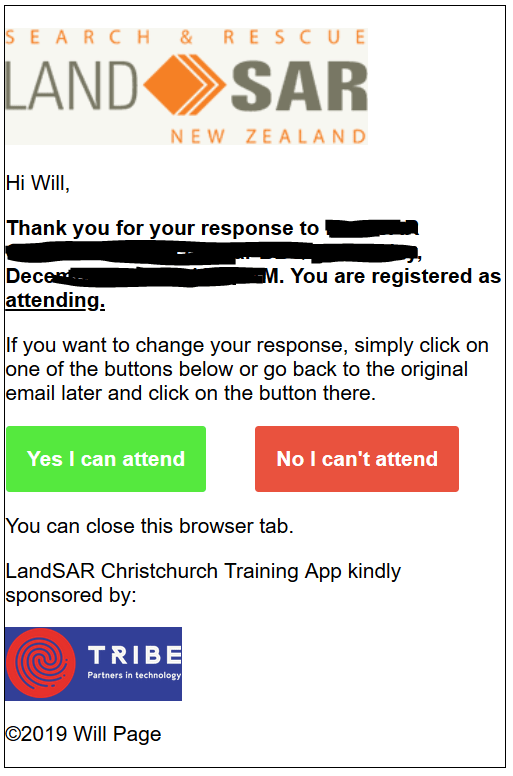
I will be the first to admit my HTML/CSS skills need work. I have no background in web development, or any development at all really besides a bit of PowerShell scripting and Power Platform, but I think I got something looking neat enough. A proper web developer would be able to go nuts with this.
So that’s it. Hopefully someone finds this useful. The Power Apps side of it is fairly run-of-the-mill stuff, but I think the HTML buttons and handling the responses might be something worth publishing for others to benefit from. Nevertheless, I though the whole context would be useful so I documented the lot.
Please feel free to leave comments.
