
Introduction:
This blog post has two purposes really. Firstly it’s a follow on from a previous article about using an Excel template in Power Automate and Logic Apps and also a quick tip about using the file content that might make some people’s lives a bit easier.
I’ve found there’s now a way of copying an Excel template in Power Automate without needing a premium connector which I thought I’d share with the tiny number of people who follow my blog (hello!) and anyone else who happens upon this article in future.
It was serendipitous really, because what I was trying to solve was the issue of writing rows into an Excel table then doing Get file content to attach to an email only to find the table is incomplete. The common workaround for this is to add a delay, but how long do you delay for? Sometimes 30 seconds isn’t enough, I want my file now now now!
The Method:
Imagine you have a Power App with a gallery. You want to generate an Excel report based on the contents of the gallery and email it to the user, or someone else, and let the Power Apps user know it worked within the 90 seconds time limit.
You would create a collection based on the gallery items then convert it to JSON format and send it to a flow.
Now you’ve done that and you’re in your Flow you Parse the JSON. In the past you’d do an “Apply to each” loop round the JSON array and inside that “Add a row into a table” into an Excel file stored in OneDrive or SharePoint. You now get the file content and copy it elsewhere in SharePoint or attach it to an email, then at the end that you do “List rows present in a table” then an Apply to each round the output of that with a “Delete a row” inside to get back to an empty file.
Cumbersome huh?
Also within the flow you need a 1 minute delay between the first Apply to each and the Get file content to make sure the Excel Online magic black box API has copied the changes to the file in SharePoint.
You only get 90 seconds in Power Apps to return something to the app to let the user know it worked! Do you return a response mid-way through the flow and hope for the best?
How about solving both these issues in one hit?
Let’s start at the point where we’ve parsed the JSON in Power Automate.
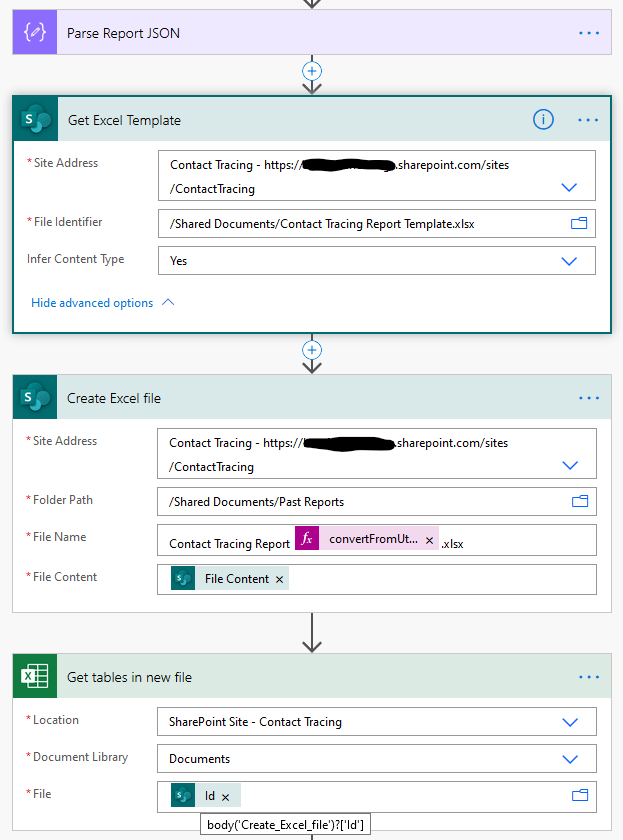
As you can see above, the first action is to get the file content of a template. Next we create a new file and lastly the action is “Get tables”. The Id property of the Create file action goes in there.
Now we have the tables listed. If your template contains more that one table you can filter the array for the various tables using the name and perform separate actions on them. You can view/set the name of the tables in desktop Excel.
Here is a sample payload of the Get tables output:
[
{
"@odata.id": "/drives('b%21F00000000000000000000000000000000000000000000glfhMH4Fi')/items('01PT40000000000000000000000P65HM6N')/workbook/tables(%27%7B87F8CCA9-59AE-490E-A1B6-E71E2A6A041E%7D%27)",
"style": "TableStyleMedium17",
"name": "Table1",
"showFilterButton": true,
"id": "{87F8CCA9-59AE-490E-A1B6-E71E2A6A041E}",
"highlightLastColumn": false,
"highlightFirstColumn": false,
"legacyId": "1",
"showBandedColumns": false,
"showBandedRows": true,
"showHeaders": true,
"showTotals": false
}
]
You might notice I’ve redacted some of the data in @odata.id with zeros.
If you’re going to filter simply run body(‘Get_tables’)?[‘value’] through a “Filter array” and filter item()?[‘name’] equals Table1 for example.
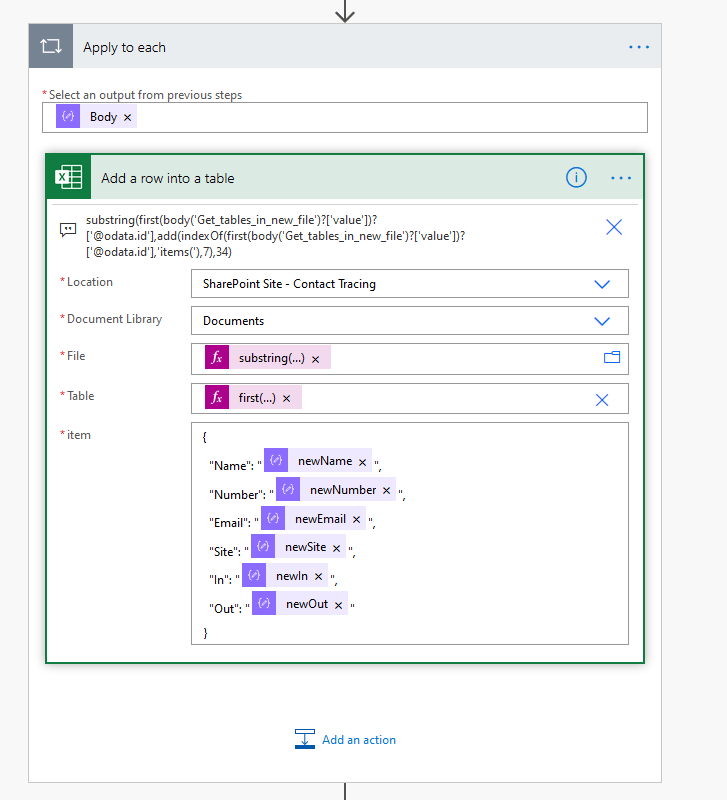
Now we need to use that information in the “Add a row into a table” action within an Apply to each around the Parse JSON output:
One of the problems I mentioned in my previous blog post was that you couldn’t do much with the dynamic content -> table mapping when it wasn’t pointing to an existing file. You could point the action to an existing file, set it up but then when you try to change the File input to dynamic content you’d wipe it out. The workaround was to use Logic Apps where you could use Code view to manually edit the action.
Now it seems like something has changed. When you add the dynamic content to the “Add a row into a table” action’s File and Table inputs, you get an item input where you can craft your request body.
It’s still easier to firstly browse to your template, select the table, put all the dynamic content in where you want it and then play with the File and Table inputs to save you writing this JSON by hand.
The data to put into File is a substring of the @odata.id property of the Get tables action:
substring(first(body('Get_tables_in_new_file')?['value'])?['@odata.id'],add(indexOf(first(body('Get_tables_in_new_file')?['value'])?['@odata.id'],'items('),7),34)
Substring() is a bit of an art. What we’re doing here is looking for the value within the /items(”) section of the @odata.id property. The input string is first(body(‘Get_tables_in_new_file’)?[‘value’])?[‘@odata.id’] because the output of Get tables is an array. If you’ve filtered the array then you would do first(outputs(‘Filter_array’)).
The document ID happens to be 34 characters in length so we take the indexOf() (input string, search string) with search string being ‘items(‘ (indexOf finds the place in the input string where the search string starts. Then we add 7 to that, because items(‘ is 7 chars long and we want the text after that search string. Finally then the length of the substring is 34 but if that was variable you can calculate it with another indexOf some text later like /workbook/
The Table input is just
first(body('Get_tables_in_new_file')?['value'])?['id']
You have to click Enter custom value in the drop down on these inputs before you can paste anything into them.
So that’s it for copying a template and adding rows. I must have missed the announcement that you can do this in Flow with the standard connector so thank you Microsoft for the game-changing feature!
Getting File Content
Now you immediately want to get the file content to email someone. You do that and the attachment has only 1 row.
Add a 1 minute delay beforehand and you’re all good, expect 1 minute is a long time when a user is waiting for a response in a Power App, and sometimes the file is ready much sooner.
We can use the same technique as above to detect whether the file in SharePoint has the right number of rows:
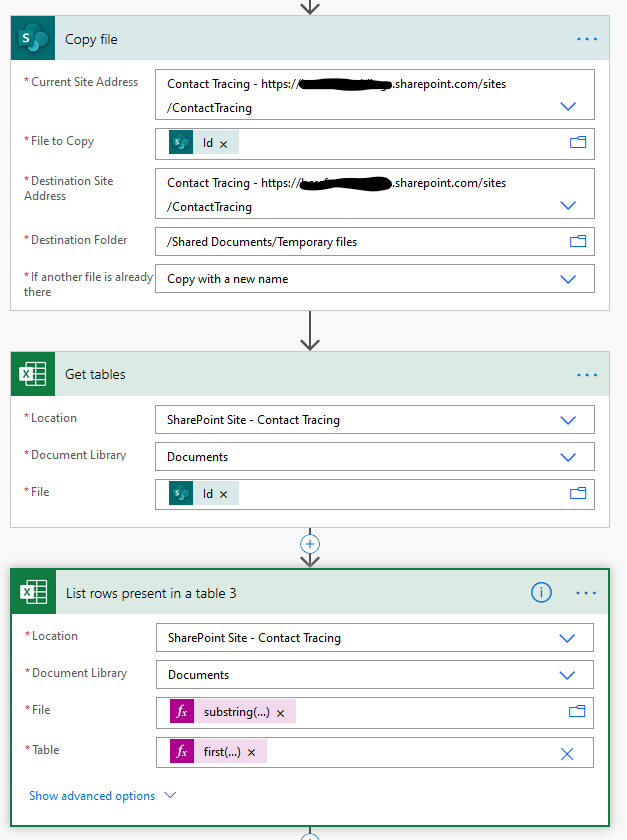
Copy the file to a temporary location. The File to Copy input of the copy file action is body(‘Create_Excel_file’)?[‘Id’] in my case – the Id property of the Create file action we did before the Apply to each loop.
The next two steps are the same except instead of writing the rows you do “List rows present in a table”. Don’t forget to go into the settings of the action and turn pagination on so you get all of them. Maximum in Excel is 5000 and the max in Power Apps is 2000, so as long as your pagination is over 2000 you should be OK. Your mileage may vary depending on your use case. If you need more than 5000 items then go to Logic Apps and use the Graph API.
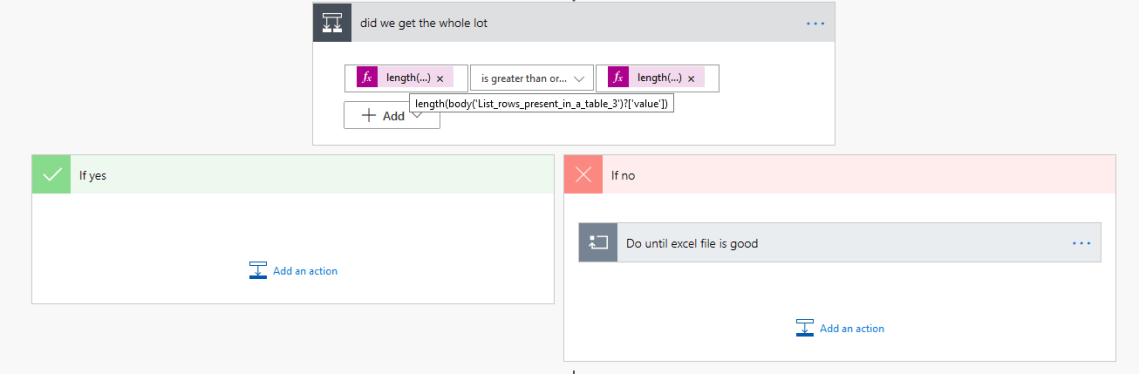
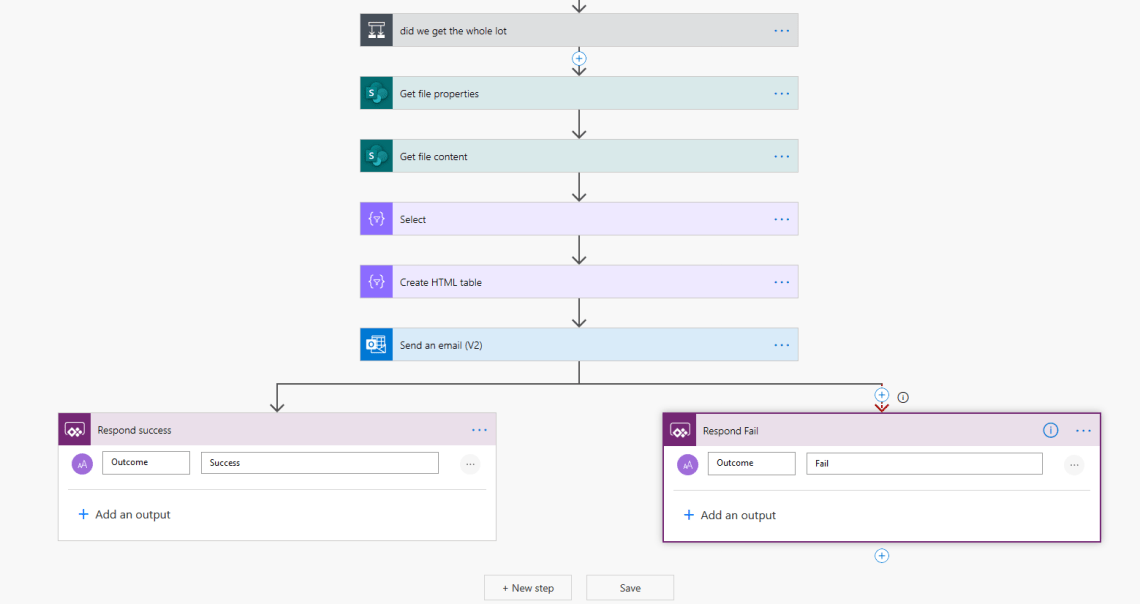
Did we get the whole lot is the name of my condition. Is the length of the result from the List rows action length(body(‘List_rows_present_in_a_table_3’)?[‘value’]) the same as the length of the original collection length(body(‘Parse_Report_JSON’))?
In other words: Is the number of rows found in Table1 of the copy of the Excel file we just read from SharePoint what we expect it to be?
If yes, we’re done, go ahead and Get file content again and attach the output to your email.
If not, then we go through a Do until loop:
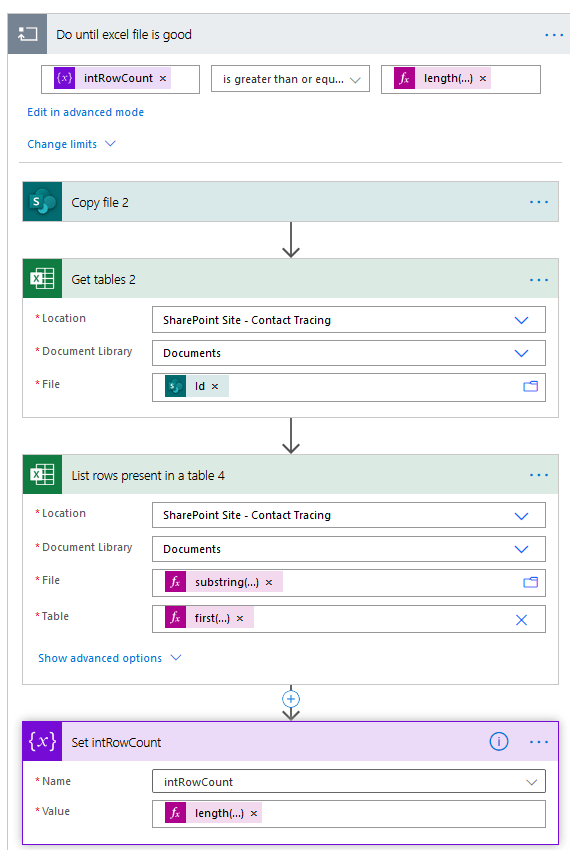
intRowCount is an integer variable that was initialised at the beginning of the flow with an initial value of 0.
We just go through the same process over and over within the Do until, until the two values (the counts of the rows between the original collection passed into the flow and the output of the List rows actions are the same).
Using Copy file is actually quite slow, it takes about 12 seconds to copy a file using that action. I don’t care enough to change it, but to speed things up you can do a two-step Get file content then Create file in place of the Copy file actions above.
Below the condition we can get on with getting the content of the file we wrote the rows into to start with (now we know it’ll have the right number of rows), then attaching it to an email and finally respond to Power Apps.
To save time I won’t bother cleaning up temporary files in this flow. Instead, run a nightly flow to get files in the Temporary files location with an Odata filter for Created less than 5 minutes ago and delete them all.

1 Comment