
In a previous blog post I described how to extract inline attachments from the body of an email and convert the image references to data URI <img> tags. This is a good technique if you want to create a PDF from an HTML source using the OneDrive Convert file action or display the message body in a Power Apps rich text control or whatever, but if you want to send an email with inline images it comes up short.
The problem is more apparent when using a non-Microsoft mail client like Gmail, which will not display the inline image properly using that technique.
This article addresses that issue. Here you’ll learn how to send emails from Power Automate or Logic Apps with inline images that will be displayed correctly by all modern email clients.
Unfortunately Microsoft don’t provide a way to do this using the standard Send an Email (V2) action, which is the current version of that action at the time of writing. The reason it doesn’t work is because that action will drop or ignore any properties of the items within the Attachments array apart from name and contentBytes. I think there’s a bit of middleware there that takes this simple two-property object and converts it to the fileAttachment resource type in the back-end. This is evidenced by the fact it needs contentBytes to be an object containing $content-type and $content properties whereas the fileAttachment resource wants those two properties to be provided separately at the root level.
Anyway, enough blather, let’s get into it.
This example is very simple and includes a single in-line attachment. If all you want is an email signature with a logo in then just do this. You might want to have a variable number of inline attachments, in which case you would need to use looping and variables to make it work, which I won’t cover here, but please ask in the comments if you need an example.
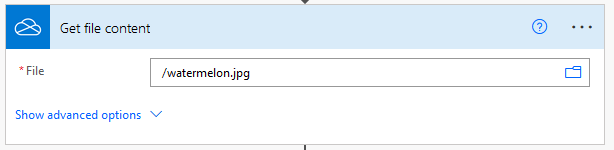
Firstly, lets get some file content for the inline attachment. This can come from anywhere but in my case it’s a JPG image in my OneDrive.
Now I’m putting the response into a Compose. This isn’t strictly necessary but it makes things easier later when it comes to adding dynamic content in a subsequent step:

Next, define the HTML body of your email. If you want to use a WYSIWYG editor for this, you can compose the email in Outlook and send it to yourself then check the source, you could use an online WYSIWYG HTML editor or you could simply use the “Send an Email (V2)” action in a flow then switch to code mode and copy the contents. Anyway, I’m keeping things very simple here and I just wrote this out by hand:

Note the <img> tag here. This is a CID URI: <img src=”cid:abc123″ />
The CID, or Content-ID is a user-generated value. I used abc123 for this example. You can make up your own. Perhaps use the guid() function then grab a substring of that or type a word then concatenate it with a randomly generated integer using the rand() function like concat(‘abc’, string(rand(1000,9999)))
If you do generate one randomly, do it in a Compose because you’ll need to reuse it.
Next, construct the message payload. There are a few things to explain here, see below the image.

To get a text version of the schema, go to the MS Graph API documentation and also make a note of the fileAttachment schema to construct that.
The things to note in the above image:
- The contentType property of the body property is simply HTML. It doesn’t follow the industry standard MIME type format.
- The content property where you see the purple Outputs dynamic content is the HTML Message Body from earlier. Note that it’s wrapped in double quotes.
- Within the toRecipients array, emailAddress.address is your recipient email. You can optionally add a property called name (toRecipients.emailAddress.name) for a display name.
- Within the attachments array, note the double-up of the @ symbol in the @odata.type property. This is some weird Power Automate thing you just have to work around. If you miss it you’ll never be able to save your flow.
- Also within the attachments array, contentType is the $content-type property of the Get file content action from OneDrive and contentBytes is the $content property of the same. You can get these with outputs(‘file_content’)?[‘$content-type’] and outputs(‘file_content’)?[‘$content’] respectively. If you get your file from elsewhere then your own flow might look a bit different. The long and short of it is you need that contentBytes property to be the plain base64 string and the contentType to be the MIME type of the content, e.g image/jpg or image/png. Note these are also wrapped in double quotes.
- isInline is set to true
- contentId is the exact same string you used in the cid: URI in the message body!
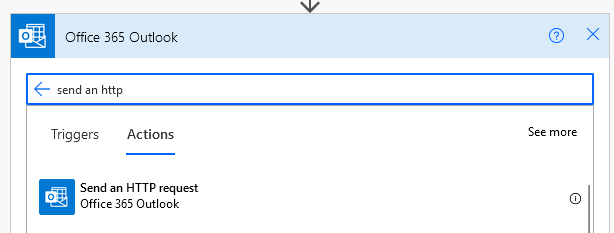
Ok, we’ve got the payload sorted, so now it’s time to send it. We do this in two steps. Please leave a comment below if you find a single-step way of doing this, but the problem I ran up against was the /me/sendMail endpoint you would normally use to simply compose and send the mail in one hit is not supported by Office 365 Outlook’s Send an HTTP Request action. The workaround is to create a draft then send it.
Add Send an HTTP request from the Office 365 Outlook connector
I’ve renamed mine to Create draft:
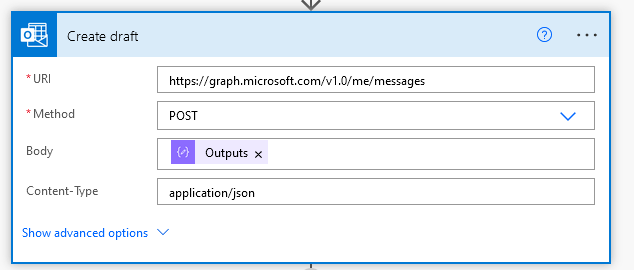
the URI is https://graph.microsoft.com/v1.0/me/messages. The Method is POST and the Body is the output from your request body compose in the previous step.
This will just create a draft, so now you need to send it. Add another Send an HTTP request action. I’ve renamed to Send message here:
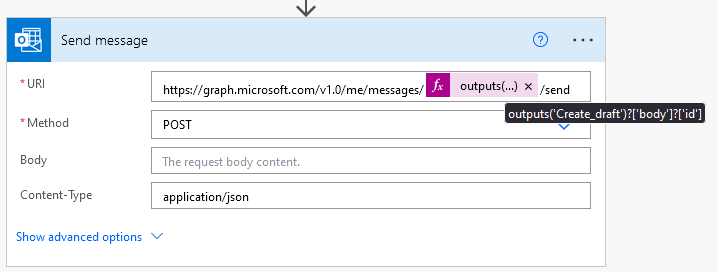
The URL is https://graph.microsoft.com/v1.0/me/messages/{id}/send where {id} is the message ID returned from the output of the previous step (create draft). You can get the message ID with outputs(‘Create_draft’)?[‘body’]?[‘id’]
So, did it work? Let’s test:

Here’s a screen shot from my Gmail inbox showing the message with its inline attachment.

Let’s look at the message source:

Here we can see the img tag within the HTML message body, and the metadata from the attachment content below that. Note the inline attribute within the Content-Disposition header and the Content-ID matching the CID in the img tag.
If you like this content and it’s helped you out, you can buy me a watermelon:


Great posts. Struggling with error “Unable to deserialize” during the Create draft message step. { “subject”: “Testing”, “body”: { “contentType”: “HTML”, “content”: “This is the body content” }, “toRecipients”: [ { “emailAddress”: { “address”: “soc-dev-aaaasl3rmpgiaf57k2xtbhymxu@ipsip.slack.com” } } ], “attachments”: [ { “@odata.type”: “#microsoft.graph.fileAttachment”, “name”: “image.png”, “contentType”: “image/png”, “contentBytes”: “base64-encoded-image-data-here”, “isInline”: true, “contentId”: “test123” } ] }
LikeLike
Never mind I got it , thank you so much!
LikeLike
👍
LikeLike