
Update 14th May 2020: I’ve published a follow up to this because it’s now possible to use dynamic content within the Excel online action without wiping out the request body. This means you can use the standard connector in Power Automate to write rows into a table in a newly copied file.
A common problem in Flow and Logic Apps, it seems, is to be able to keep a template Excel file containing tables, copy the template then insert rows into a table in the copied file while leaving the template alone.
This article should hopefully give you some guidance about how you can get around this problem.
The trouble with the Excel Online connectors is they require you to browse to an existing file and then select the table before you can configure the action:

In this action I’ve firstly browsed to an existing file (the template), selected the table, linked all the columns to my dynamic data from SQL, then tried to take the string from Destination File Path in the Copy file using path action as the File input in the Excel connector. The file doesn’t exist so there’s an error.
It seems like the Excel connector isn’t actually looking for a path, it wants an ID, and the GUI actually interprets an ID into a path to display to you, the user. We can see this in action by selecting a real file then going “Peek Code”:
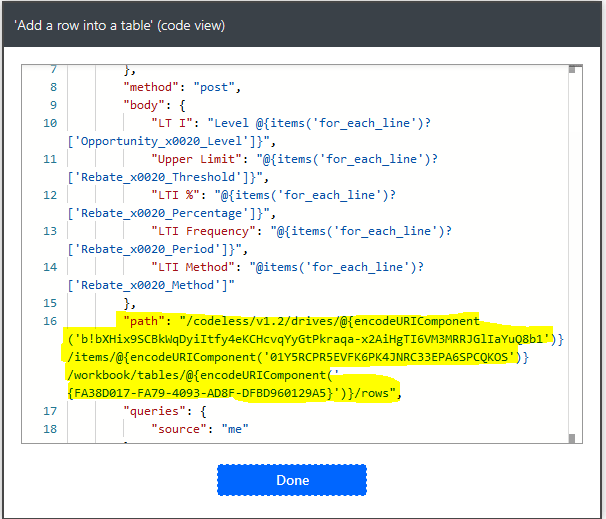
Here you can see the “path” parameter within the code view that points not only to the location and file but also to the table itself. They are not human friendly strings.
You can also see the body of the action, a JSON object that links the column names and values as key-value pairs. In this case the values are recognisable as dynamic content from within an Apply to each loop
So maybe if we can get the path/file information for the copy of the file dynamically and replace the original template file name in the action, and because the table name/ID and columns are the same in the copied file, the action might work… fingers crossed…
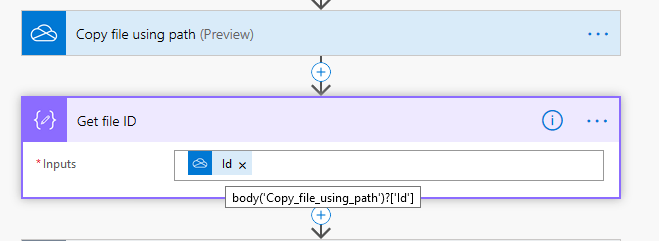
Copy file using path has an ID attribute – but is this the Id of the original file or the copy? I’ll skip proving it and tell you it’s the copy, so we might be able to use it. What does it look like when we run the flow?
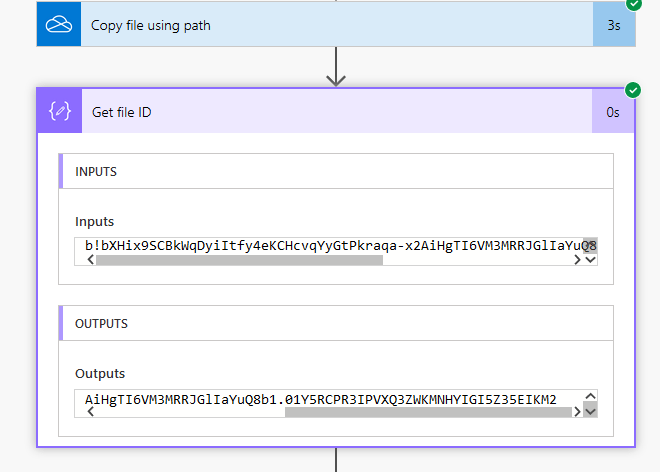
Well, the output is too long to fit in the display, but the compose action’s input and output is always the same so I’ve scrolled right on the output to show the whole string. It looks like this:
b!bXHix9SCBkWqDyiItfy4eKCHcvqYyGtPkraqa-x2AiHgTI6VM3MRRJGlIaYuQ8b1.01Y5RCPR3IPVXQ3ZWKMNHYIGI5Z35EIKM2
If we go back up to the path property of the working Excel action, we see some recognisable information here:

Looking at the first part of the path, it matches the compose output before the period (.), which is the Id of the OneDrive library for this user, and the second part, after /items looks very similar to (but is not exactly) the part after the period.
So, the Copy file using path’s Id attribute is the Id of the new file, including its document library ID.
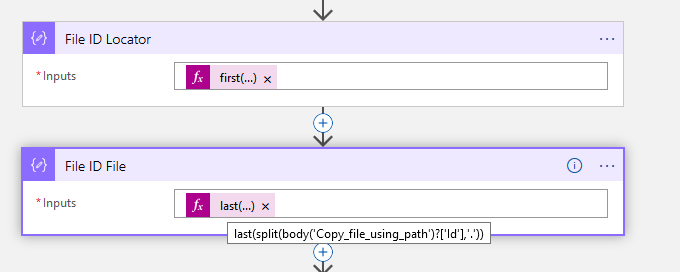
Because I’m copying the template into the same place as the source file, the first part – the library ID – remains the same. All I care about is the bit after the period. To get that we use an expression.
last(split(body('Copy_file_using_path')?['Id'],'.'))

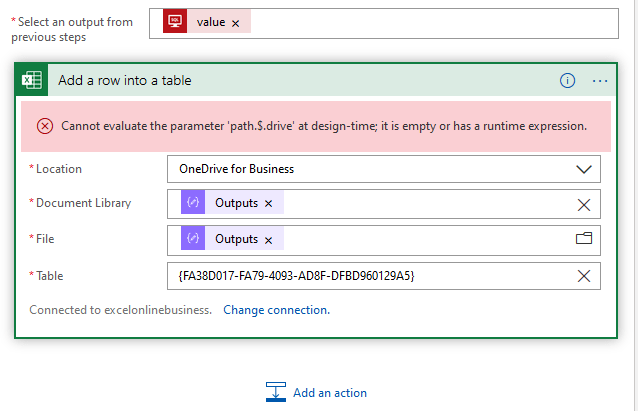
Now what if I try and use this as the File property in the Excel action?
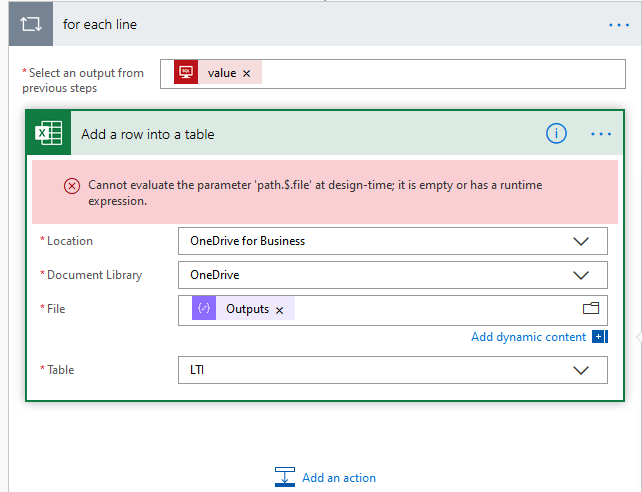
So it’s throwing an error that it can’t evaluate the parameter at design-time, which is OK, we wouldn’t expect it to (because the file doesn’t exist yet). But if it hasn’t broken the body attribute then maybe it’ll work. Let’s peek code again:

Yup, it has unfortunately. We don’t even need to run this to know it’s not going to work. The body has been removed by changing the file.
So what next? A couple of options.
1. Logic Apps to the Rescue!
We can export our flow to a Logic Apps template, and import that into an Azure subscription. I won’t go into detail of how to do that here, but the result is your lovingly crafted Flow is now an Azure Logic App. This only works if you don’t use any connectors or triggers that aren’t available in Logic Apps. Maybe you can re-engineer your workflow to take just this bit out into a Logic App or maybe your whole Flow in its entirety can become a Logic App.
In any case, in Logic Apps you can do more than just Peek Code, you can actually manually edit it in Code view.

Here I’ve replaced the Document library and File with dynamic content by splitting the Id of the Copy file action on the period and taking the first() and last() items in the resulting array, putting them into Compose actions and then adding them in here, leaving the body intact.
Flicking back to design view, the same error appears as we had in Flow, but this actually works because the body is still there.
It’s unfortunate that changing the File parameter of the Excel action breaks the body in Flow, but Logic Apps is more versatile in that regard because we can manually code the properties of the Excel action to make it do what we want.
But what if you don’t have access to Logic Apps?
2. Using the Graph API in Flow
For this you will need a premium license because you must use either a custom connector or make an HTTP request from within the Flow, which are both premium features.
I can’t see a lot of reasons why you’d want to do this vs. using Logic Apps with its consumption based billing, but there are some reasons:
- You need an approval action in here
- You need to trigger from Flow button for mobile
- You need to trigger from PowerApps
- You don’t have access to an Azure subscription
It’s beyond the scope of this article to describe ways you can re-architect your workflow to get around these, but assuming you can’t, you won’t, or you already have Flow or PowerApps premium licensing anyway, this is how to do it.
Getting started with the Graph API is also beyond the scope of this article, and I would point the reader to Google to figure out what you need to do, but in condensed form, you need access to Azure AD to create an App registration with the appropriate permissions (Files.ReadWrite) then generate an OAuth secret in that. (Edit: I’ve since written another article which includes more detail about setting up an App registration. In that article I go into setting up a custom connector, but you don’t need to do that here, just use HTTP and set the OAuth authentication up directly in the HTTP action)
Once past the Azure AD App registration, you can create an HTTP POST action to do the work.
N.B. it does take a while, an hour or more, for the App registration permissions to take effect and you get intermittent 403 errors while that’s happening so be patient!

The three formulas in the URI are the two components of the Id attribute of the Copy file action from earlier (split on the period and take the first() for the drive and the last() for the item), and finally the name of the table in question.
You may notice that the column headers are not posted in the body of the request. You have to run left to right and include all the columns. In my case the second column is “0” in each HTTP POST, because I’m not using that column here but I still have to put something in it. Perhaps an empty string “” will do, but I haven’t tried that.
It’s worth noting that Microsoft recommend that all the rows are created in a single request by creating an array with the source data first then HTTP POSTing that, rather that iterating through a loop like I am here. In the context of Flow, that would be infinitely more efficient, and also best practice.
I looked into that a bit and found you can’t easily create a 2 dimensional array in a Flow or Logic App. the Append to array variable action won’t take an array as its input, but you can add 2 dimensional arrays in the Initialize variable and Set variable actions so maybe you can do something clever with string variables in an apply to each loop and then finally push that into an array variable. Needs more testing, so if you try this and have any measure of success, please let me know.
Microsoft also state that it’s expected to get the occasional 503 error and if so, you should retry, so you will also need to work that logic into your Flow.
Summary
Here are two ways you can add rows to Excel from a template, a cheap and easy one (using Azure Logic Apps and hacking the Excel action), or a pricey one that can use Flow but requires a premium license.
Of course you can use the HTTP POST action in Logic Apps too, and you might well want to do that because you can POST the entire update to your table in one HTTP request, which has got to be quicker and more reliable vs going through a For-each loop, and also take advantage of consumption based billing in Logic Apps.
You might have also noticed that my HTTP method requires Application permissions to the user’s OneDrive (I’m hitting it by drive ID). I probably could have run this in user context and hit /me/drive/. I’d recommend looking into that, you might avoid a lot of hassle with your IT admins.

2 Comments