
Updated 4th March 2021 in light of this functionality being available natively in Power Automate.
UPDATE: I’m not sure when this became available exactly, but now you have the ability to update Planner checklist items directly via the Update task details action in Power Automate.
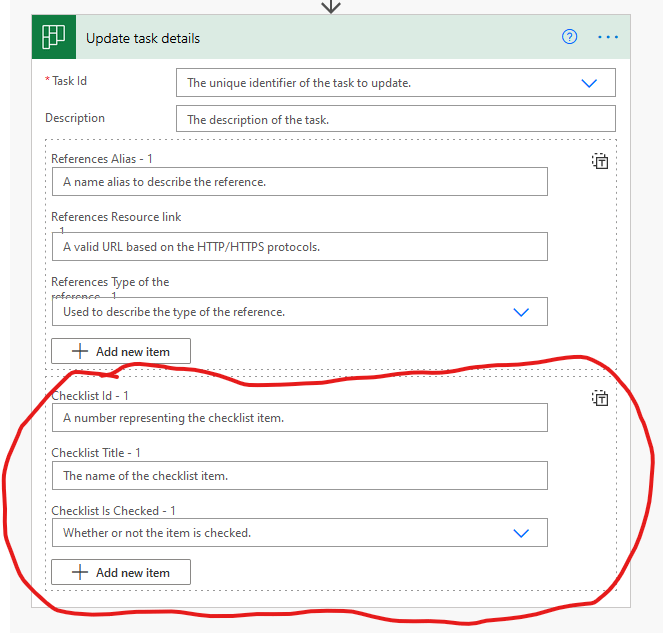
So, after over 8000 views of this blog post in a little over a year, it’s now pretty much redundant. I’m glad to have helped so many people along the way.
Sadly, you still don’t have the ability to “Show on card” so some elements of the post below are still valid if you want to do that.
Introduction
Power Automate & Logic Apps have a connector for Microsoft Planner. While the native features it has are very useful, there are a couple of omissions:
- No ability to add checklist items
- No ability to “show on card”
These may seem minor, but in fact checklist items are very useful in Planner tasks, as is the ability to show the description, or indeed the checklist items on the card without having to click on the task to see those things.
Although we can’t use the standard Planner connector, the ability to do those things is thankfully exposed via the Microsoft Graph.
However, if you’re a Power Automate user, then unfortunately you will need to stump up for a premium license for this, which will be US$15 per month or whatever your local currency conversion is. I’m in New Zealand and it’s available via my CSP provider for a little over NZ$20 per month.
In my scenario it makes sense to use Logic Apps instead. The reason for this is my workflow doesn’t require any connectors or features that are only available in Power Automate, such as Approvals, and I don’t need to trigger the process from a Flow button for mobile or directly from a Power App. In Logic Apps an action costs US$0.000025 so you really need a lot of runs of very complex workflows per month before it starts to make sense to use a premium Power Automate license over Logic Apps. In fact I think you would never get there because of the new per-day API limits in Power Automate.
For the purpose of this blog, the two are almost identical. The only slight difference is in the custom connector setup. Anyway, back to the technical side.
Custom Connector Setup.
I feel like a lot of this is already well documented elsewhere on the web. I’m certainly not the first person who has ever blogged about setting up a custom connector to the MS Graph API, but I’ll try and resist the urge to be lazy and go into more detail that I feel I should!
Azure AD App Registration
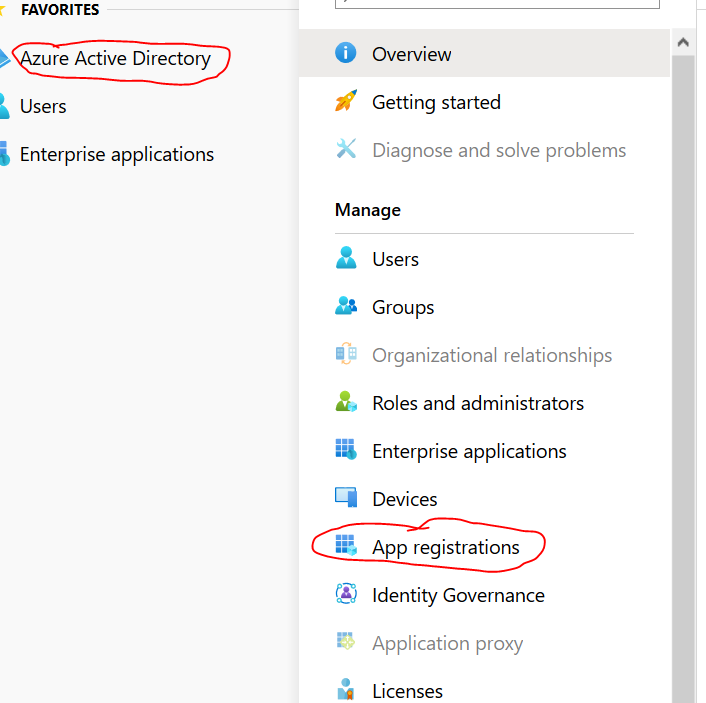
Firstly you need to go into Azure Active Directory. You can get to this via https://aad.portal.azure.com. You don’t need to be an admin or in any way special to do this as far as I know, but if you’re blocked from it, then speak to your IT department about doing this for you.
You need to create an Azure AD app registration. This allows your custom connector to authenticate using OAuth with a key you generate. The process is simple; create the App registration, assign it rights to the relevant API endpoints and generate a secret key. It means that the end user (the account your connection in the Flow/Logic App is running as) doesn’t need to be a member of every group in the whole org in order to read and update tasks (with the standard Planner actions it does).
As an aside, I’m not going to get into the whole process of doing this solely with the custom connector. The reason why is because it involves more setup time in the custom connector and I’m just one guy blogging this for no personal benefit of my own. If you have a multitude of groups and you want to automate it to the Nth degree then you will find the relevant MS documentation here. In my case I will suffer the hassle of having to be a member of the groups I’m automating tasks for, and use the standard connector in conjunction with the custom connector.
- Within Azure AD portal, click on Azure Active Directory, then App registrations:
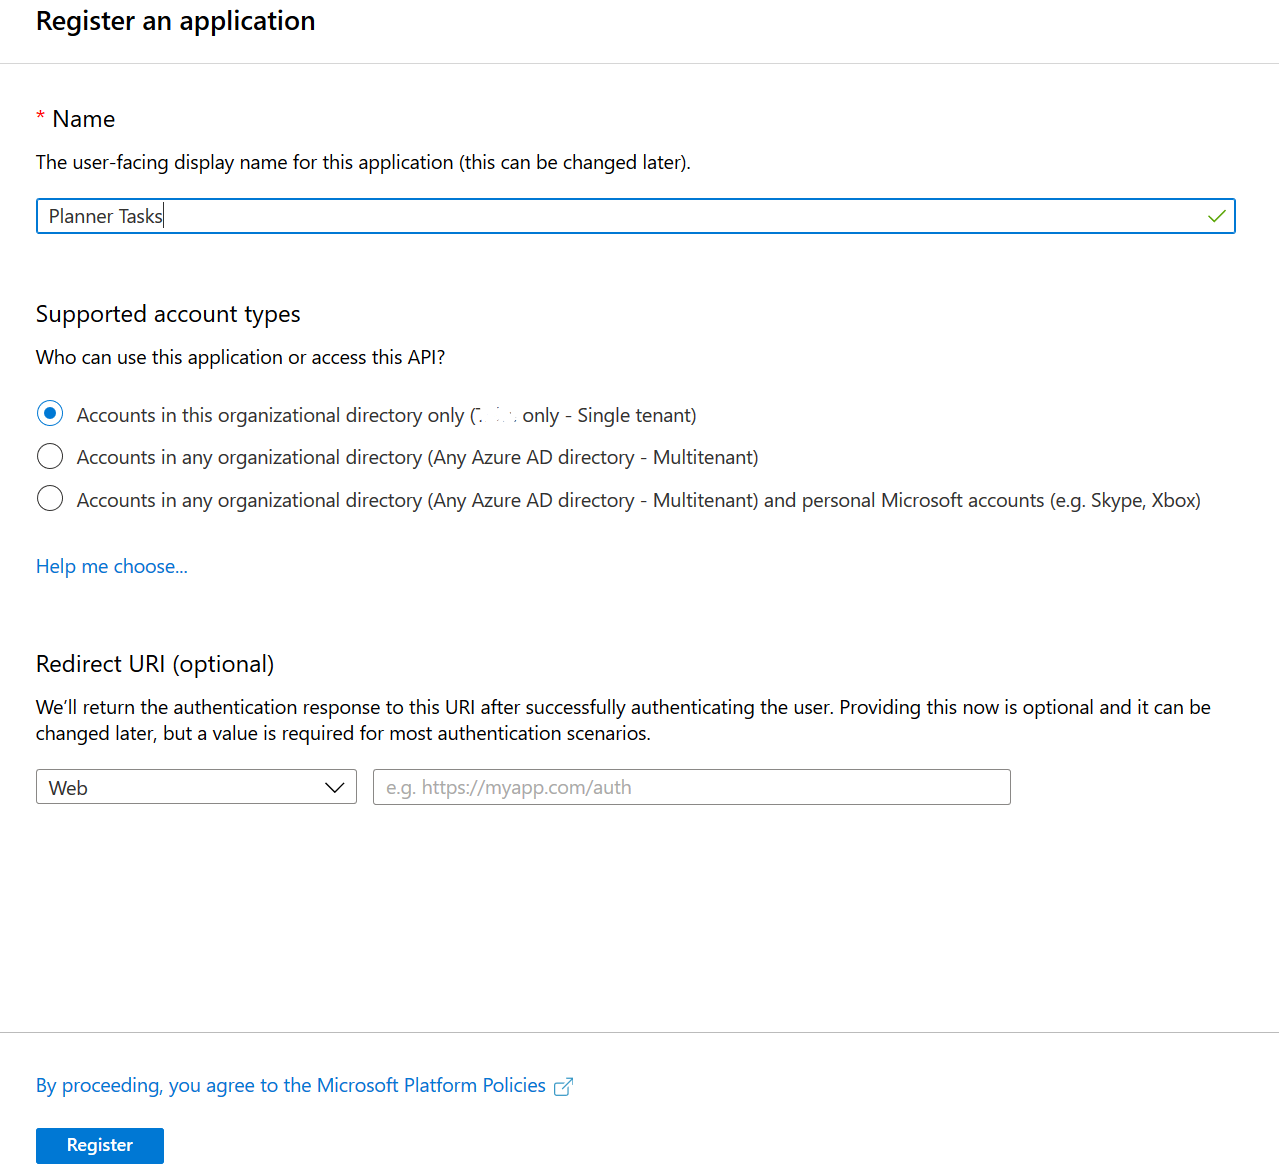
- Now click + New registration up the top and you’ll see Register an Application
- Call it what you like, from a technical perspective it doesn’t matter.
- Leave everything else on the defaults and click Register
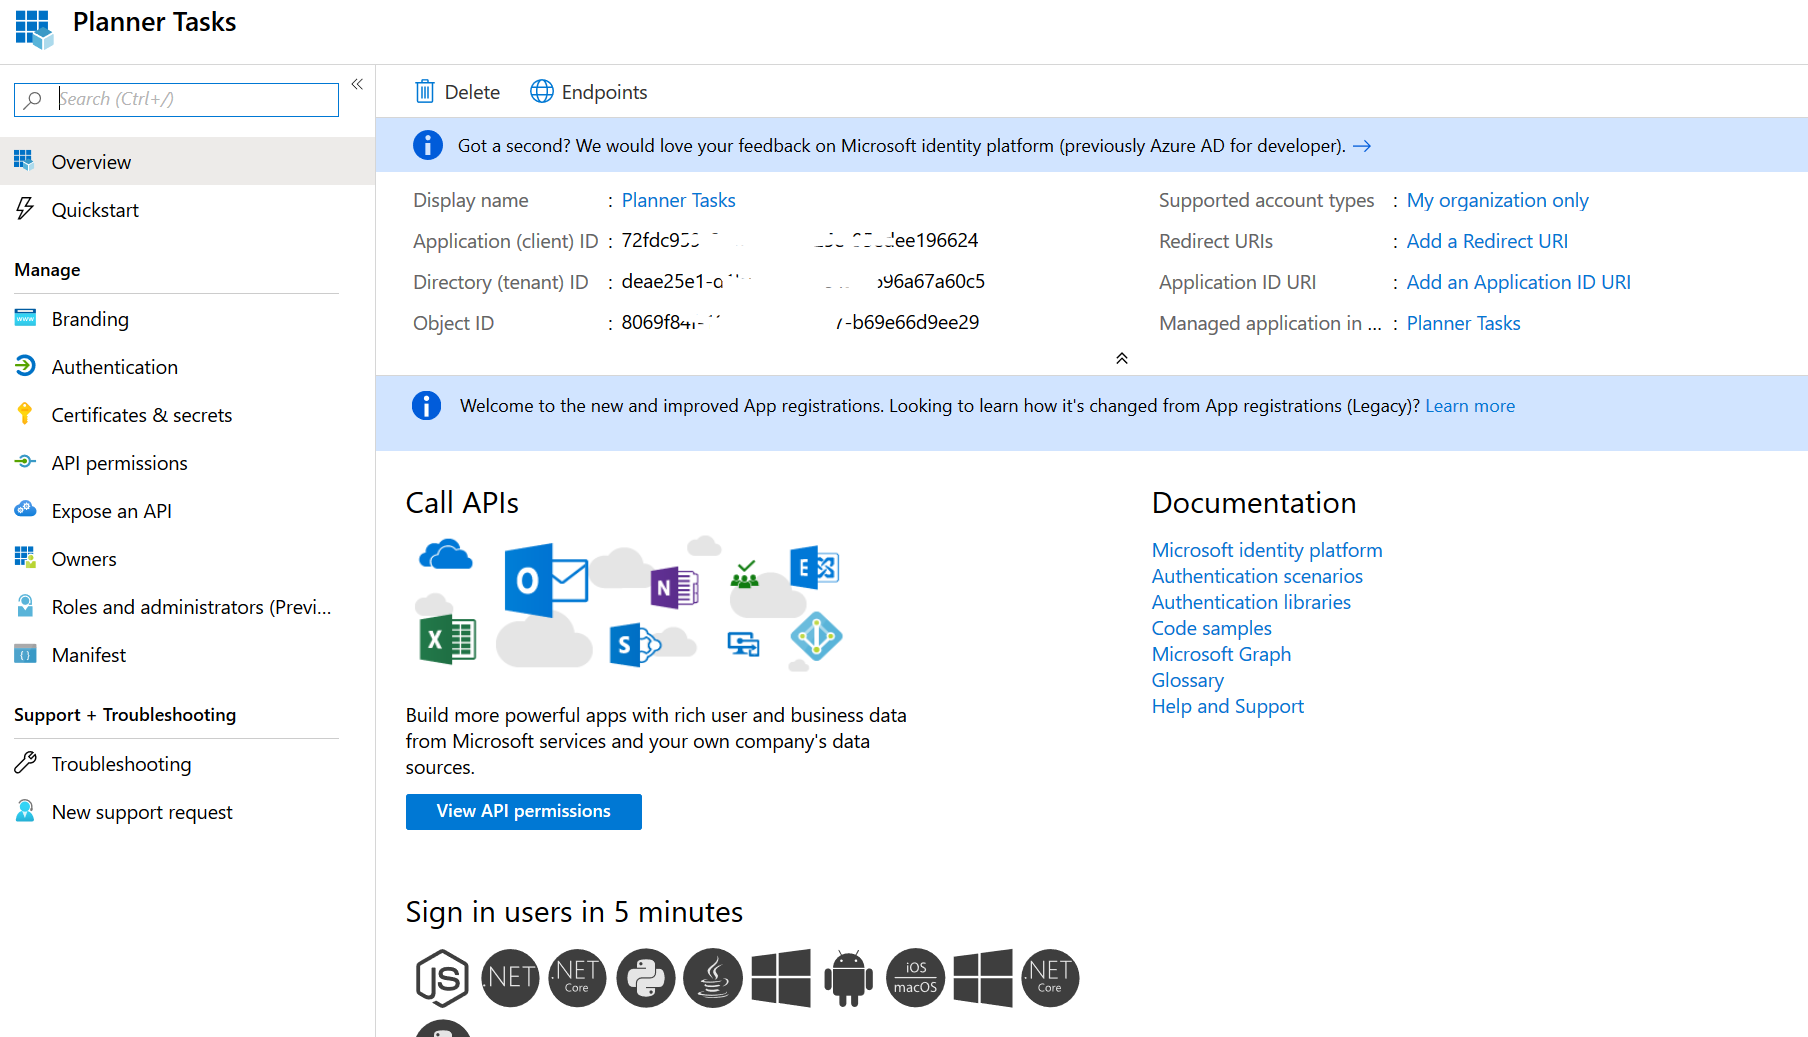
- Next you’ll see a screen like this. I’ve redacted some info from this, but the Application (client) ID at the top will be useful later. You don’t need to copy it down or anything, it’ll always be visible to you.
- Click View API Permissions
- You need to add Microsoft Graph Delegated permission Group.ReadWrite.All:
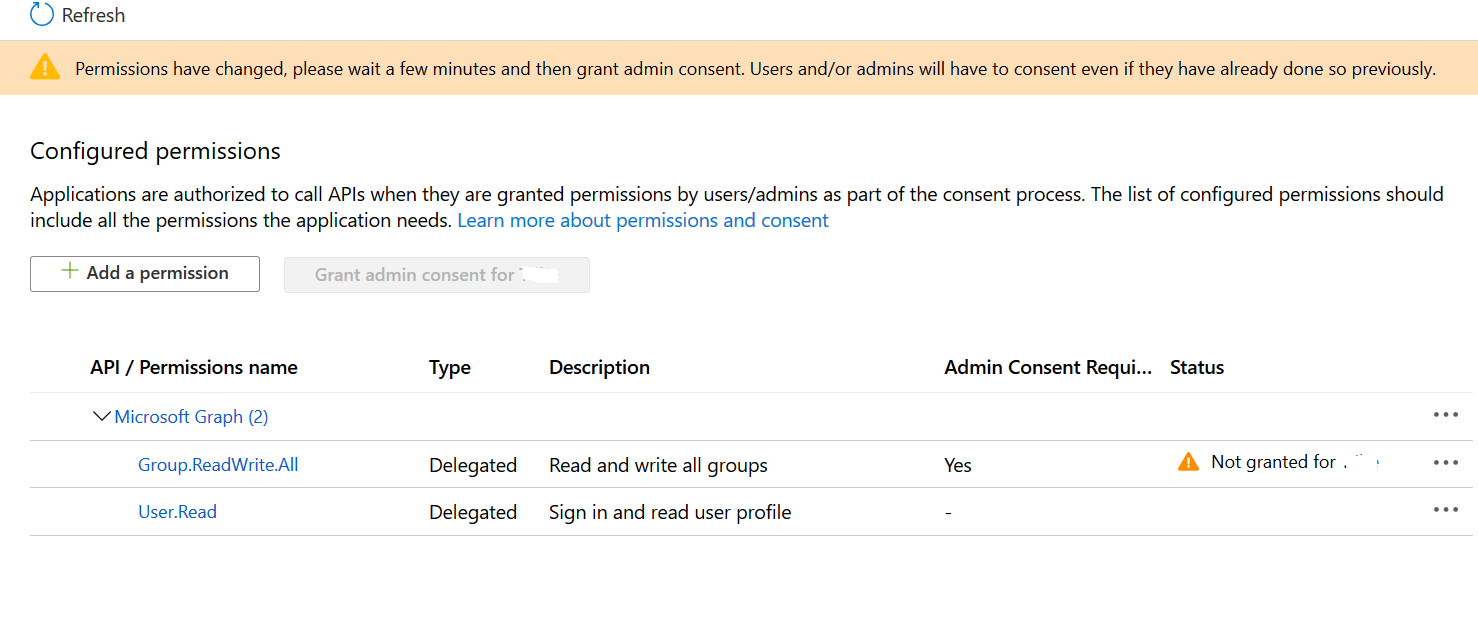
- Now, this is where you will need either admin rights, or the cooperation of someone with admin rights. If you work in a huge mega-corporation then you have my deepest sympathy because you’ll probably never get this past the bureaucracy. In any case, if you’re logged in as an admin (which in these screen shots I’m actually not), the greyed out button “Grant admin consent for {your company name}” will be available. Click it.
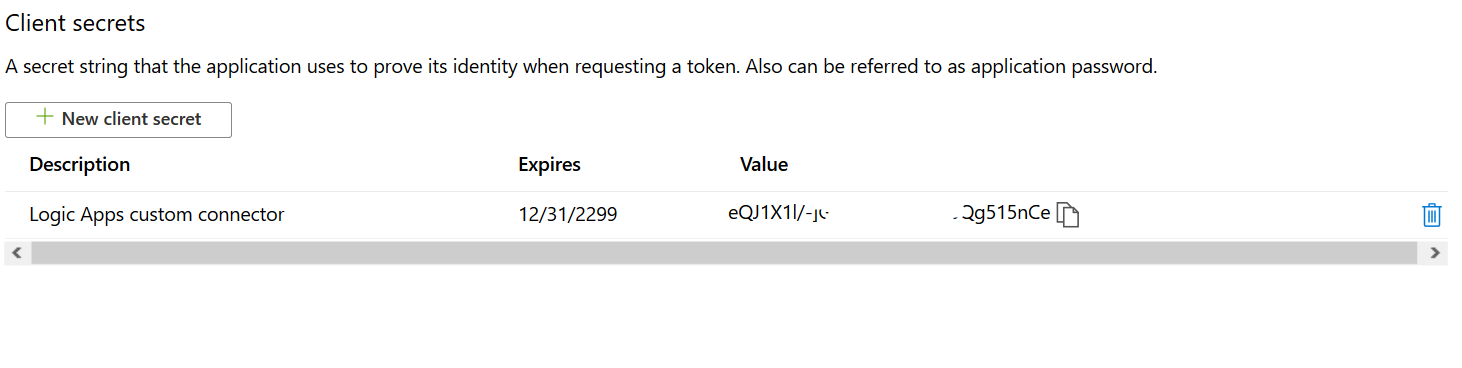
- The next action is to generate an OAuth secret key for use in your custom connector. Click on the gold key symbol in the left hand menu: Certificates and secrets, then click New client secret:

You can generate multiples of these for use in different places, which allows you to revoke a secret later without breaking other apps, but for this, we only need one. I’m also a hands-off sort of person so I’ll elect that it never expires.
- Now the secret is exposed to you just this once. Copy it down! If you don’t copy this down and browse away, you’ll have to trash it and generate a new one. It’s no big deal really, but don’t make it any harder for yourself.
That’s the Azure AD App registration almost done. Keep the browser tab open, you’ll need to come back here for one last bit later. Now onto the next part:
Custom Connector Setup.
Now, I know I have already said I’m using Logic Apps for this, but in this example I’m actually going to use the custom connector setup in Power Platform, and switch back to Logic Apps later. The reasons for this is because a) You have the ability to test it and b) I feel my audience might be more Power Automate focussed. Either way, the setup is almost identical and if you’ve set up the custom connector in Power Platform, you can export it as an OpenAPI file and import into a Logic Apps custom connector, so you can take advantage of the test page in the Power Platform custom connector setup then import it into Logic Apps when you know it’s good. You don’t need a premium Power Automate license just to do that.
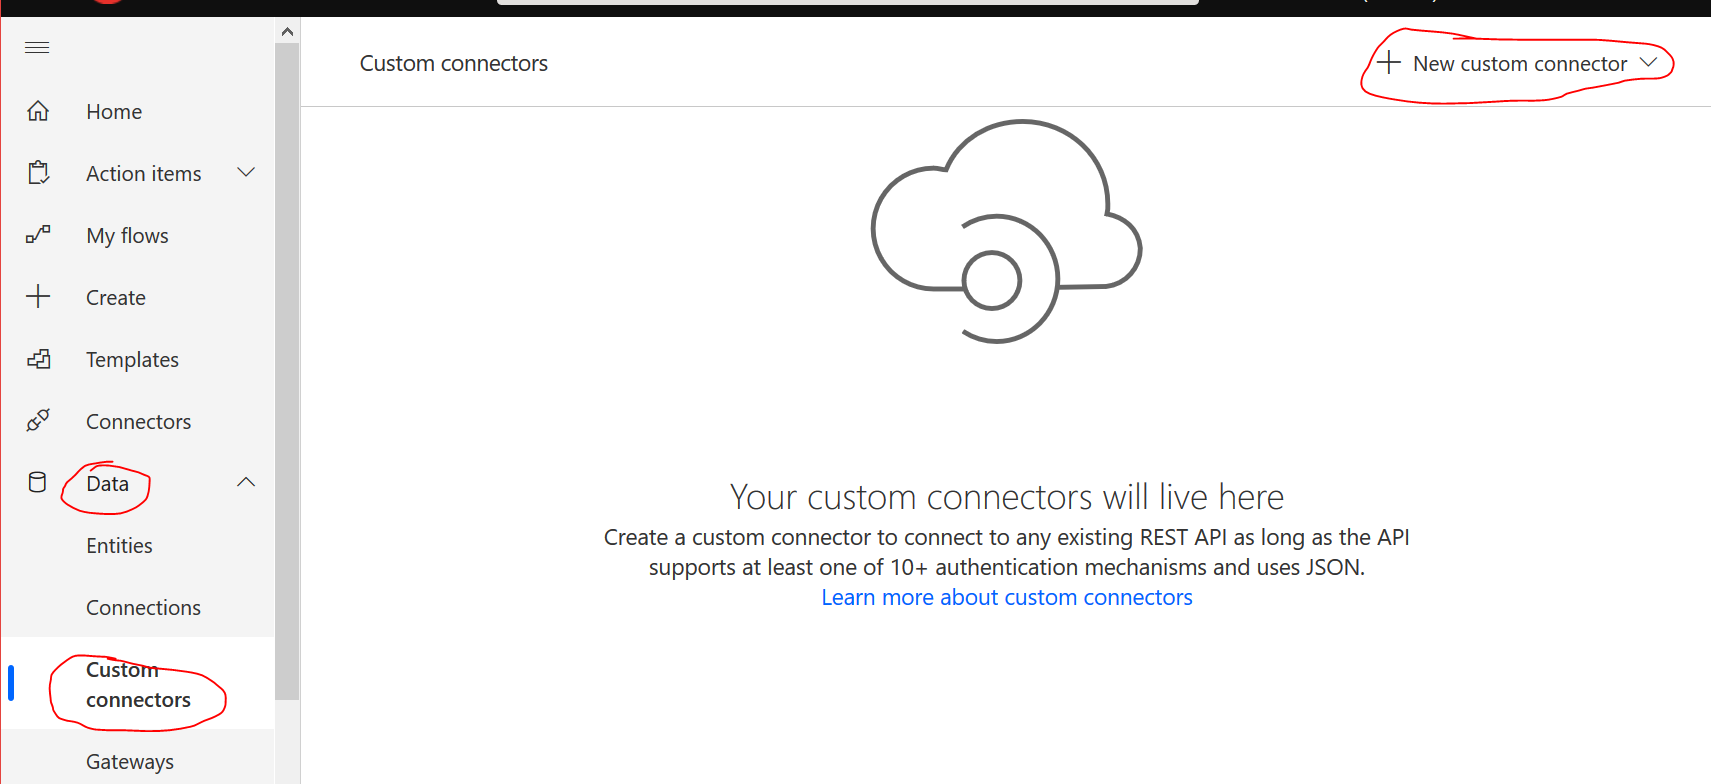
- In Power Automate portal, go Data -> Custom connectors -> + New custom connector -> Create from blank. Call it what you like, like Planner API or whatever.
- The only thing you’ll need to change on the General Information screen is the Host, which should be graph.microsoft.com

- Click Security in the breadcrumbs up top and pick OAuth 2.0 from the drop down.
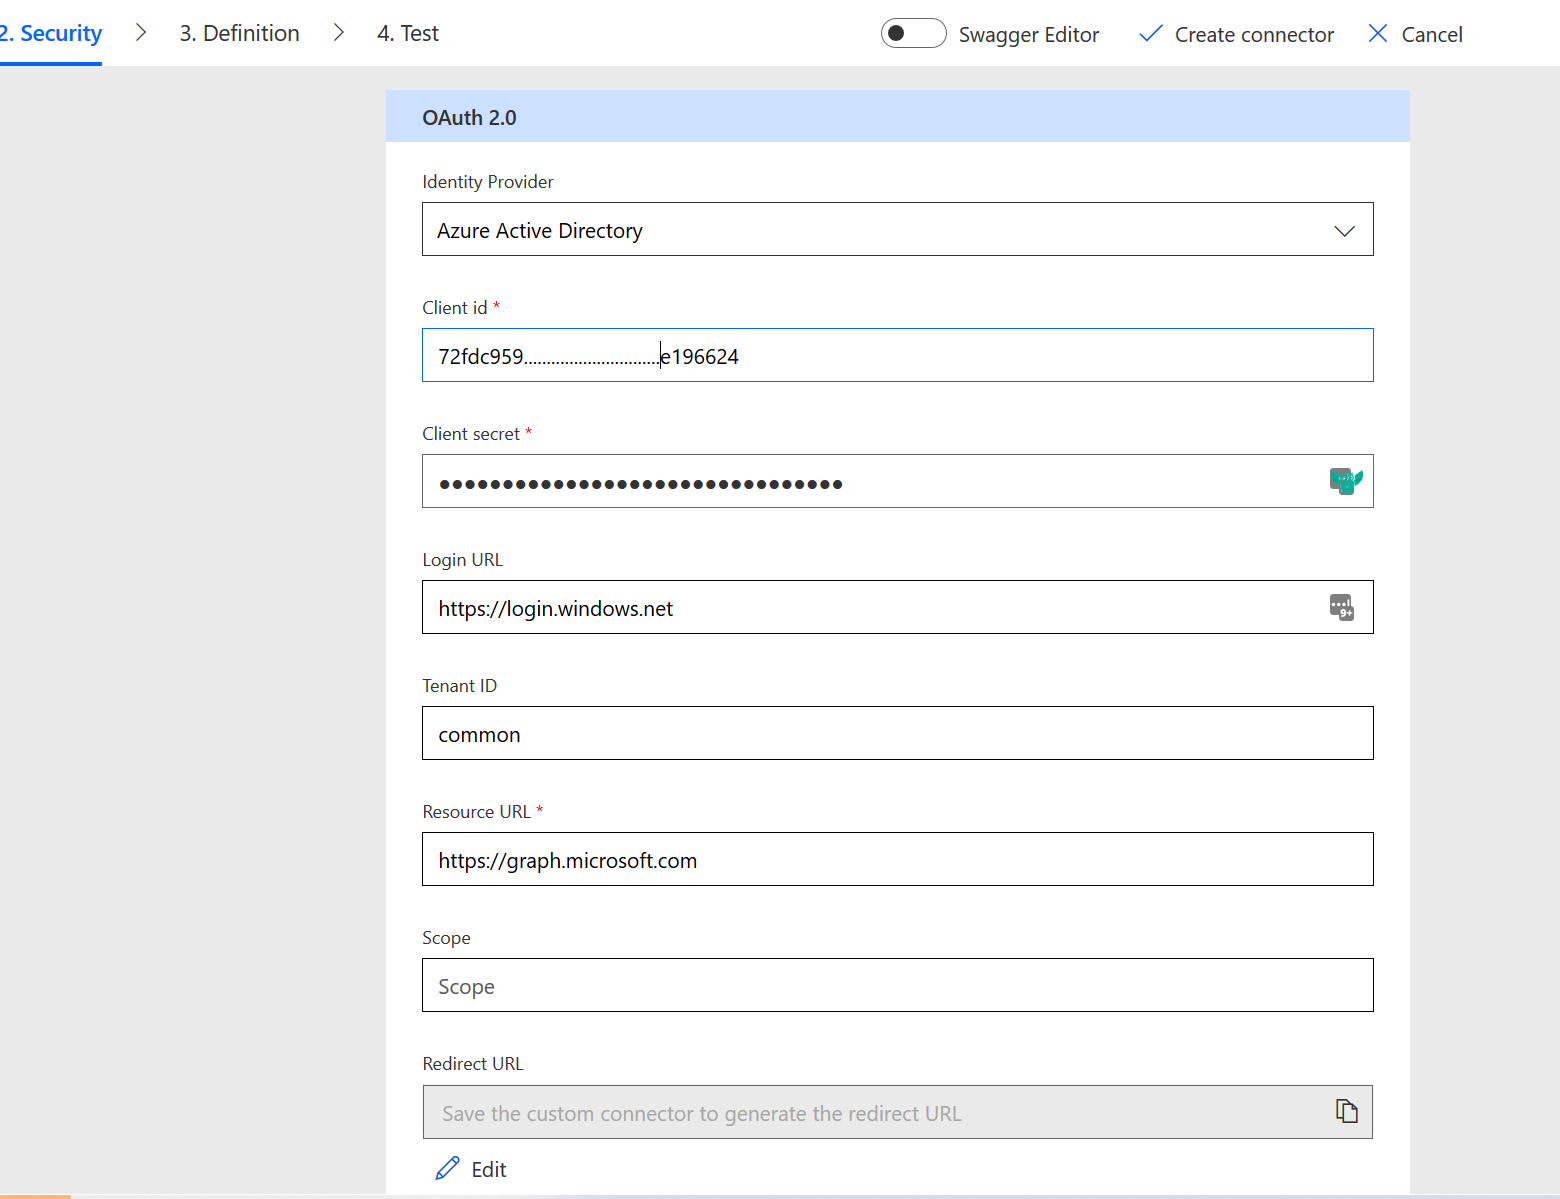
- Choose Azure Active Directory as the identity provider.
- The Client ID is available in the Overview page of your App registration you did earlier. You’ll see the GUID type string at the top called Application (client) ID. Paste it in here. I’ve redacted mine.
- The client secret is what you generated and noted down earlier
- Leave Tenant ID and Scope on the defaults/blank and put https://graph.microsoft.com as the Resource URL.
- Now click Create connector. Doing so generates a redirect URL in the grey box at the bottom. Copy it and browse back to your Azure AD App registration
- In the welcome page (where you copied the client ID) there’s a link on the right that says “Add a Redirect URL”. Hit that.
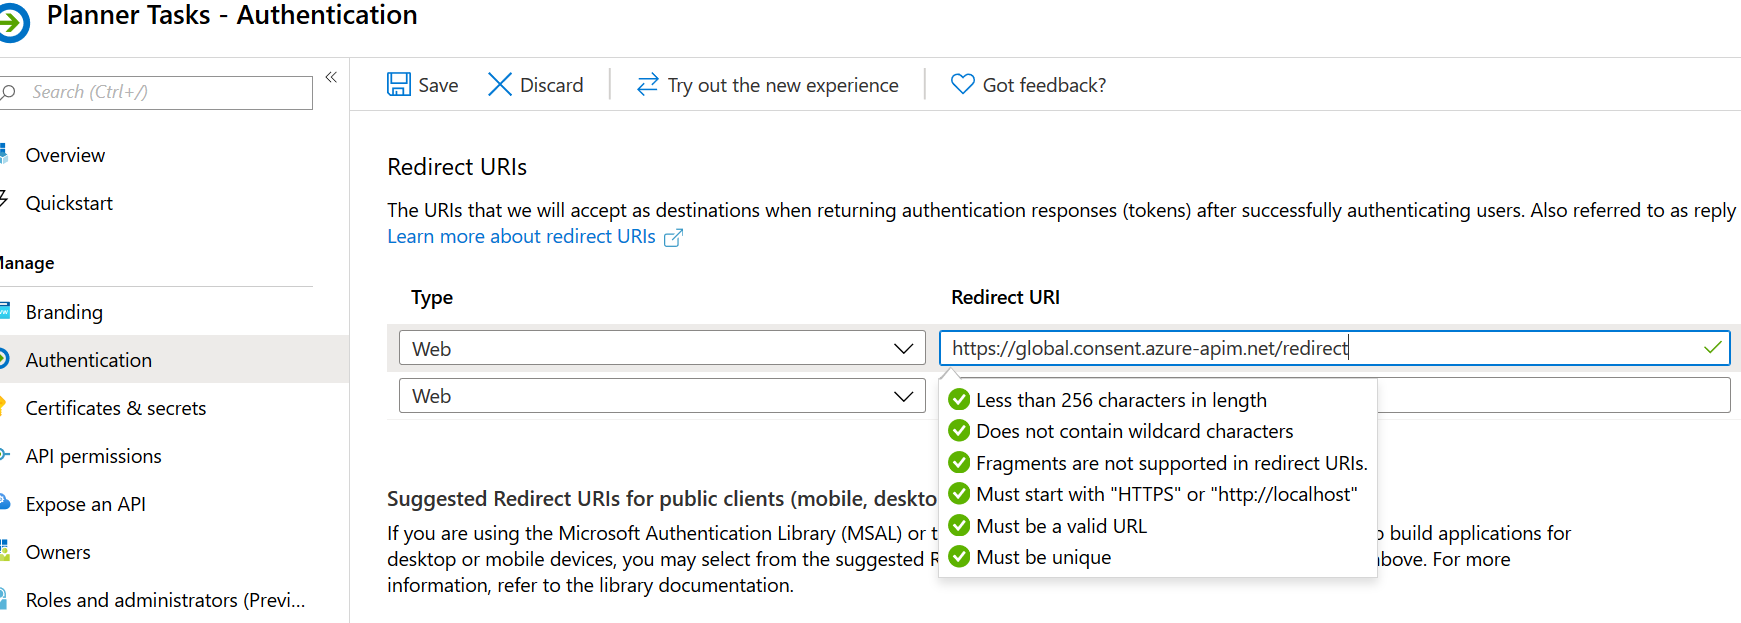
- Paste in there and hit Save.
You’re now done with Azure AD, you can close the tab.
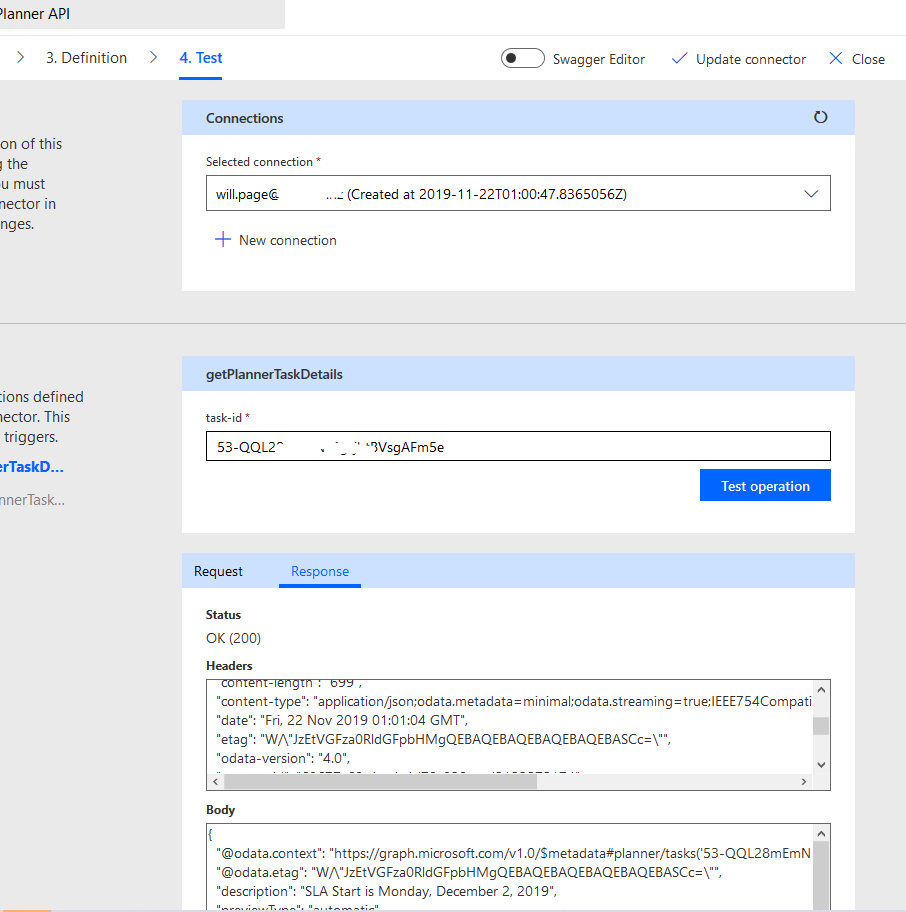
- Back in the custom connector setup, click 3. Definition in the breadcrumbs and go New action. The first one you need is going to be called Get Planner task Details:
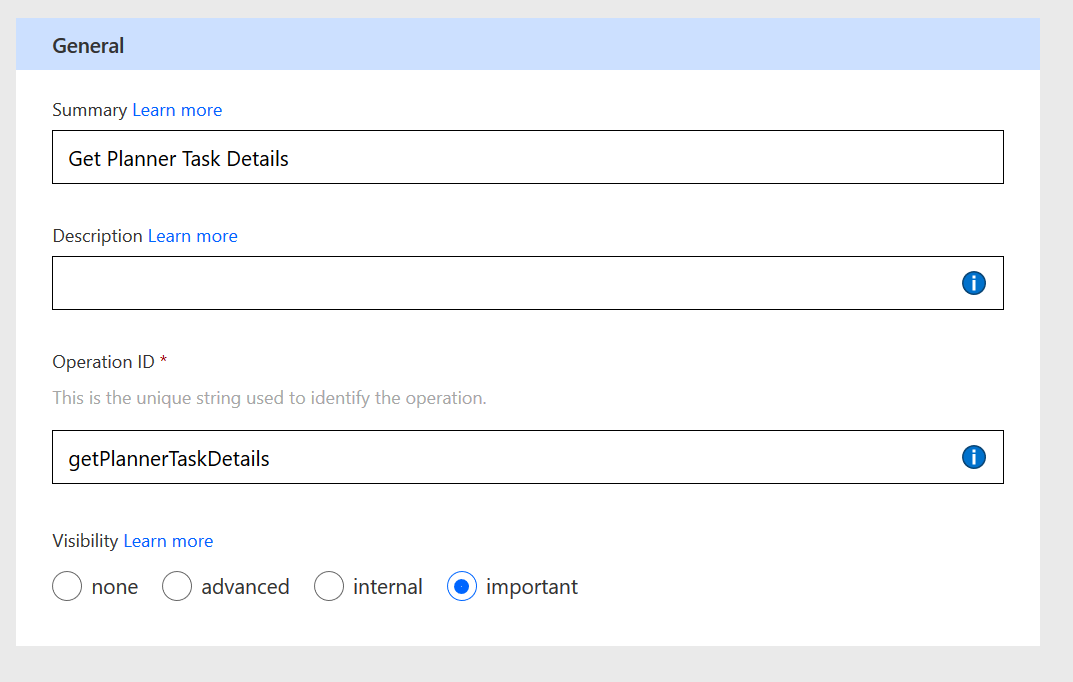
You can call it what you like really, as long as you know it’s going to get planner task details.
You might wonder what’s wrong with the Planner Get task details action that already exists out of the box. What it’s missing is the @odata.etag property, which we need later as is only available via the Graph, so we must do it here.
- Next, click Import from sample under the Request heading. Set the Verb (method) to GET and put https://graph.microsoft.com/v1.0/planner/tasks/{task-id}/details as the URL:
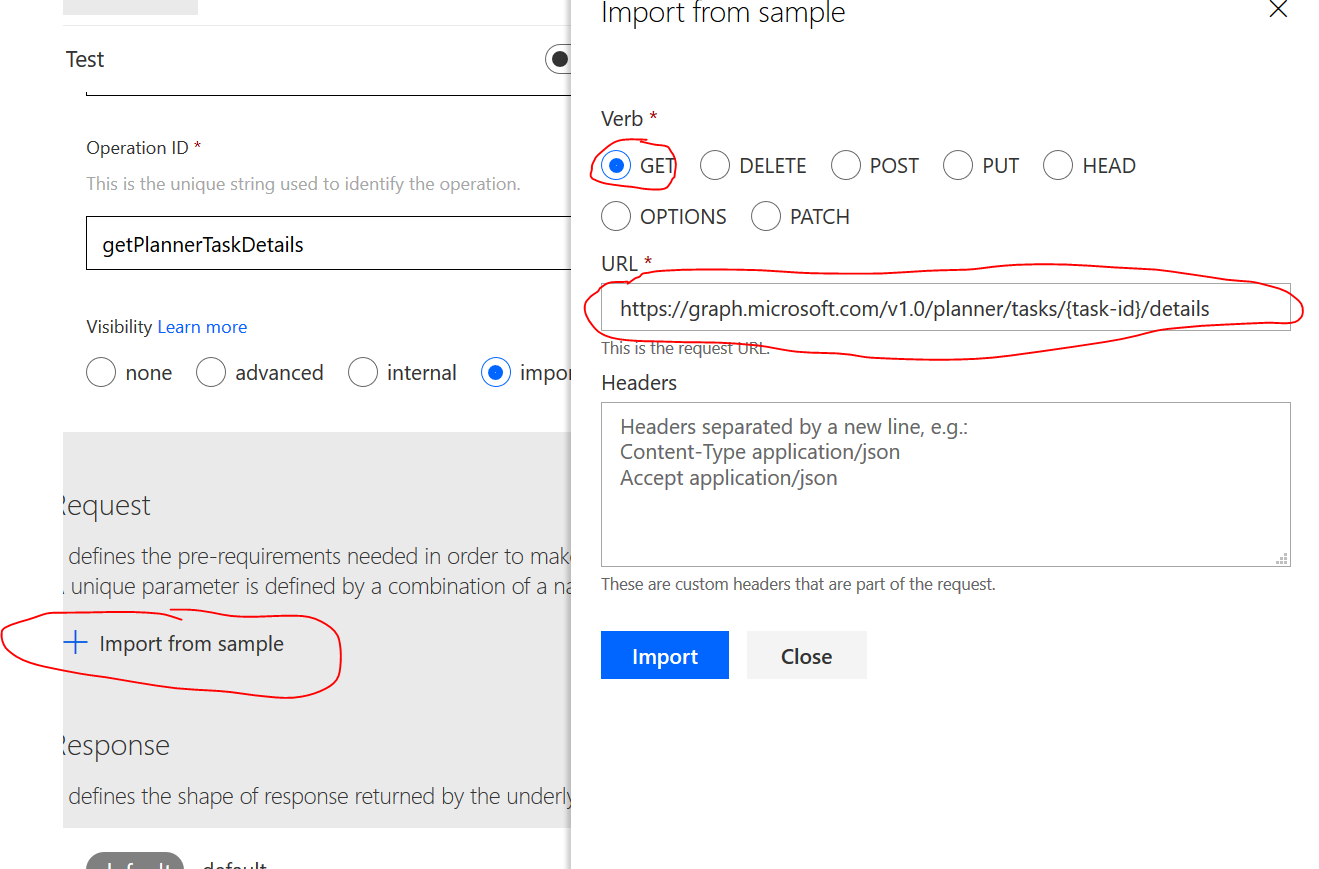
- Click Import.
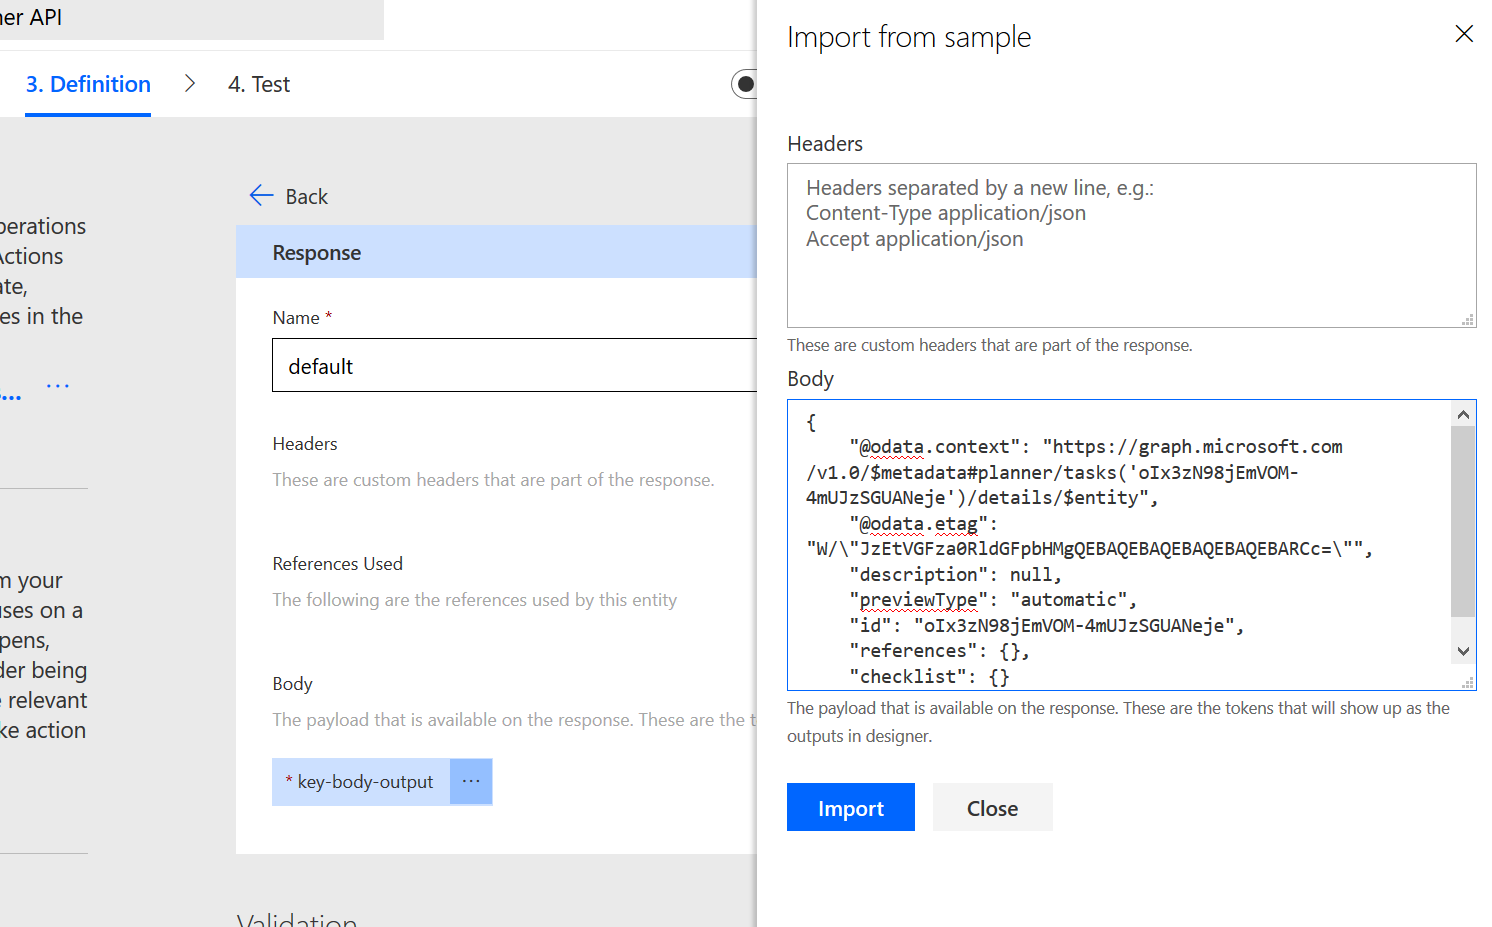
- Now scroll down and click the grey Default button under Response (you can just see the top of it in the screen shot above). This brings up a frame with + Import from sample in the top right. Click that.
- Now paste the following sample payload into the box as shown below:
{
    "@odata.context": "https://graph.microsoft.com/v1.0/$metadata#planner/tasks('oIx3zN98jEmVOM-4mUJzSGUANeje')/details/$entity",
    "@odata.etag": "W/\"JzEtVGFza0RldGFpbHMgQEBAQEBAQEBAQEBAQEBARCc=\"",
    "description": null,
    "previewType": "automatic",
    "id": "oIx3zN98jEmVOM-4mUJzSGUANeje",
    "references": {},
    "checklist": {}
}
This data is publicly accessible. I got it by going to aka.ms/ge then clicking Show more samples in the left hand menu, turning on Planner then clicking “details for Planner task”. The sample response is this JSON. Graph explorer is very useful in this regard.
- Click Import. Now, if you know the ID of an existing task you can click 4. Test in the breadcrumbs and test this action. You can get the ID of a task by creating a flow with a create task Planner action in it, or some other Planner task related action that returns the ID, do a test run then copy it out of the results. You will need to create the connection to the connector, but thankfully you’re guided to do that in the Test page.
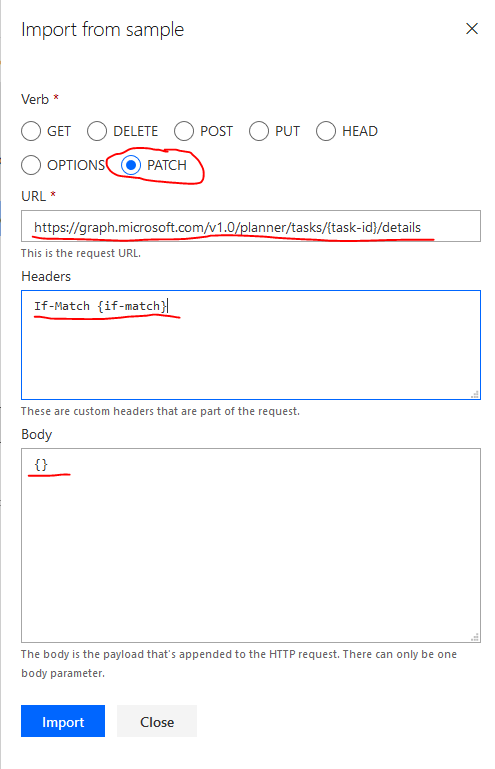
The next thing to do is create another action. It’s going to be called Update Planner Task Details. We follow almost the exact same process as before.
- The Request method on this one is PATCH, and the URL is https://graph.microsoft.com/v1.0/planner/tasks/{task-id}/details
- You need to specify a header: If-Match {if-match} this is vital for the action to work.
- When you’ve chosen PATCH as the Verb you also have to specify the body. Just type open and close parentheses {}, this allows us to free-text the entire request body in the Flow/Logic App action itself.
- You can leave the response definition on the default for this action. All we care about is whether the request was successful or not, and that comes back with an HTTP status code that’s interpreted natively by Power Automate/Logic Apps (i.e. the action succeeds or fails) and we don’t use any other output as dynamic content later on.
You now have the custom connector setup so you can start developing your workflow.
Using the custom connector in Power Automate/Logic Apps
I’ll start this section by saying I’m now going to jump back into Logic Apps. I’ll also mention that up until now I’ve created everything from scratch for the purpose of this document, but I’m going to start screen shotting stuff I’ve got in production (I’m lazy) but the custom connector I use in production has a different name and some other actions I’ve added for other purposes.
Apart from that, the only difference between the custom actions in Power Automate vs Logic Apps, is the colour and the icon.
Firstly, you will need to define your checklist items. There are a few ways you could do this; define them within the flow (hard coded), or maintain them in one of several outside data sources such as a SharePoint list or an Excel table. In any case, your checklist items must be available to you as an array.
The simplest method for this is to “hard code” them into an array variable. Use the action called Initialize variable and type them in using the format below, in the order in which you would like them to appear in the Planner task.

You don’t need to initialise any variable if your checklist items are coming from a SP list or Excel file etc, so if that’s the case, ignore the array variable and read on.
- Next, if you’re in Logic Apps, you need a compose action like this:

This is a buggy kind of thing that’s probably intentional, that if you try and put the string “@odata.type” in the body of the Update Planner Task Details Action, it complains the JSON is invalid. Furthermore, if you put @odata.type into the input of a compose, you can’t save your Logic App, so you need to precede it with an extra @. When the Logic App actually, runs, it drops the extra @.
If, however, you are a Power Automate user, then only put a single @ symbol in there: @odata.type
We use this compose action later on in the custom Update Planner Task Details action.
Now we want to create a For each (Logic Apps) or Apply to each (Power Automate) loop with the array containing the checklist items as its input.
In the Logic Apps designer, you need to be at a stage where the id of a task is available to you as dynamic content, i.e. after a task has been created. so you have the id of the task you want to update in hand.
In my example I’m getting my checklist items from a SharePoint list. A non-technical team maintain the list via a Power App. If you hard coded yours, the variable goes in here, otherwise use the array returned by your Get items, Get rows, List rows present in a table, or the output of whatever action you may have that returns an array. Remember you have a maximum of 20 checklist items per task and each checklist item has a maximum of 100 characters.

Add an action within the loop and hit the Custom tab. Any custom connectors you have will appear in the top (I have one, called MSGraphAPI. Up until now it’s been called Planner API in this blog). In the lower pane it lists the actions:
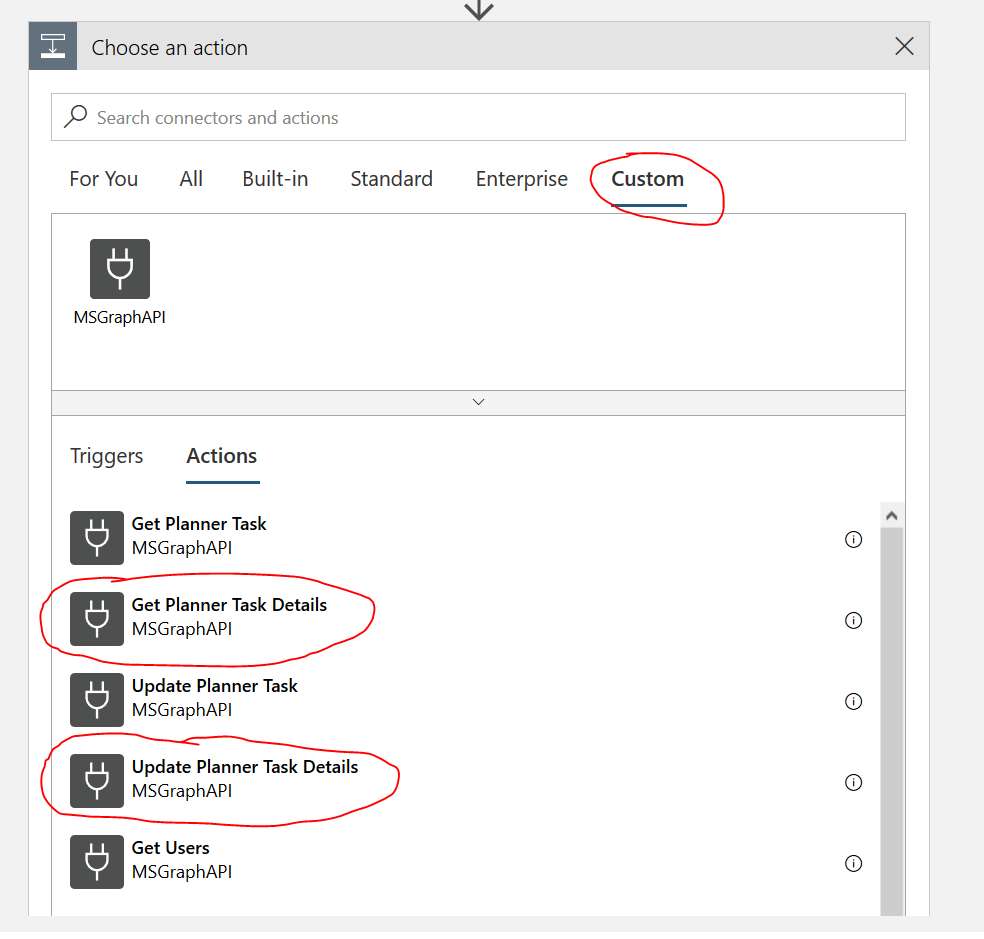
In this screen shot I’ve circled the ones we use here. If you followed my guide up until now you’ll only see these two. All the others are not relevant for this exercise.
- Select Get Planner Task Details. It has one input, the id of a task, which will be available as dynamic content from an earlier action. Maybe you created the task earlier in the workflow, or you stored it in a SP list column in another process outside of this workflow. In any case, it needs to be the ID of a task that hasn’t been deleted.
- Next add the Update Planner Task Details action from your custom connector. You need the id of the task, use the same original dynamic content that you input into the Get Planner Task Details action. You also need to populate the If-Match property with the @odata.etag value from the previous step (this is actually the only reason we need to go the Get first, to harvest this value from the Planner task details properties).

I’ll take a minute to explain what this @odata.etag/If-Match parameter is.
Like everything in SharePoint, a Planner task details has a version. I’m not sure whether the version history is accessible to Joe End-User, or indeed developers through the API. I don’t think it is, but every time you update a task details, whether that’s through the Planner GUI, the native Planner actions in Power Automate/Logic Apps or via the API, that @odata.etag value changes. When you update the task details via the API, it wants to know what version of the task details you’re wanting to update. The only way you know the @odata.etag value of the latest version is to pull it with a Get right before you update it.
Now the guts of it – the body. I’m going to cheat here and show you one of my production actions:
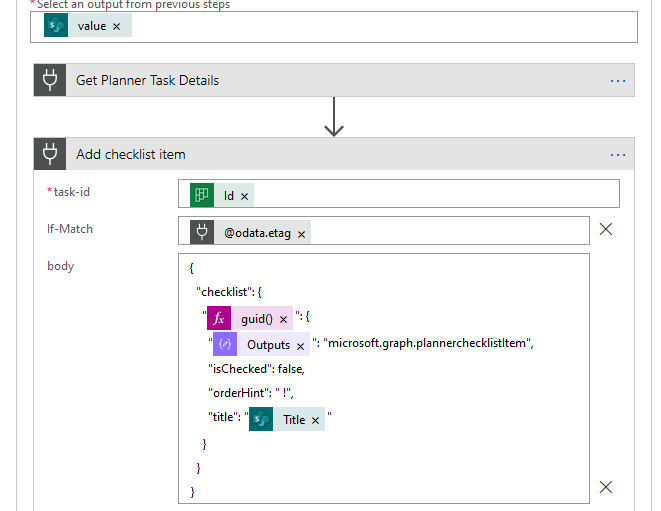
You can see the purple Outputs is where I’ve put the dynamic content from the Compose action called odata type in.
For each checklist item, you need to specify a guid, it’s the key of the key-value pair comprising the body of the checklist item. Thankfully there’s a built-in guid() function in Logic Apps and Power Automate that does it. See the example here for guidance.
In my case the checklist item text is the Title column of the SP list. If you’ve hard coded yours into an array variable you’ll want to use “Current Item”, e.g. items(‘Apply_to_each’).
Also please note: Unless you go into the settings of the for-each loop and set the concurrency to 1, your checklist items will be in a random order. With concurrency set to 1, they will appear in the planner task in the order your retrieve them from your data source, or the order you define them in your array variable.
If you also want to add a description, set the preview type to checklist (so it shows it on card) or enact any other one-off change to the Task Details, it can be done in a subsequent pair of Get Planner Task Details -> Update Planner Task Details requests outside of the for-each loop (see MS docs link above). If you’re doing that, the body is quite simple. For example the whole request can just be
{
"previewType":"description"
}
..if all you want to do is show a task description that already exists on the card, or
{
"previewType":"checklist"
}
..to show the checklist on the card.
Anyway, that’s just about it. I hope this blog has helped someone. It would have helped me if it existed before I first tried this!
Please feel free to leave feedback in the comments, or leave a donation by PayPal:

Or Stripe:
Make a one-time donation
Make a monthly donation
Make a yearly donation
Choose an amount
Or enter a custom amount
Your contribution is appreciated.
Your contribution is appreciated.
Your contribution is appreciated.

Do you still need all the guids if you just want to copy an entire task (inc. checklist) to another planner? How would the body section change in this instance? Any help is greatly appreciated!
LikeLike
I’m not sure how planner handles checklist items with duplicate GUIDs across plans; whether you can take the whole body of an existing task and use it in the body of a new one, I’m not sure.
If you delete the old task between getting its details and updating the new one it might be fine, but you’d want to make sure it’s going to work.
LikeLike
When I making a test in Power Automate I receive error code 403 and the message are:
“You do not have the required permissions to access this item.”
How to avoid that?
LikeLike
Hi Fredrik.
Your problem is likely related to the API permissions you have granted (or not granted) to your App Registration. You will need the Delegated permission: Microsoft Graph -> Group.ReadWrite.All and make sure a Global Admin in your tenancy has granted admin consent for the organisation. See the 4th screen shot in the article.
LikeLike
Hi,
I have access to the Global Admin account so I have permissions for Group.ReadWrite.All, so unfortunately that isn’t the problem.
LikeLike
If you can post a screen shot in the comments, run a test in your custom connector setup and post the details here. Alternatively, go to flowug.com and start a thread there.
LikeLike
Attached you find a screen shot after running the test.
LikeLike
I see. Also please click View API permissions in the Azure AD app registration and screen shot that.
LikeLike
Absolutely, comes here.
LikeLike
The problem is that the Group.ReadWrite.All permission is of type: Program (in English it’s shown as Application). There are two types, Application and Delegation. You should remove the Application permission and add the same but with the type Delegation, grant admin consent again then retry.
LikeLike
Ah, great, thank you!!!
LikeLike
Thank you for the great tutorial but I keep getting a bad Request
“message”: “The request is invalid:\r\nValue cannot be null.\r\nParameter name: qualifiedName”,
Any suggestions how to resolve this?
LikeLike
You will need to provide more context with your question. At what stage are you getting the error, and what are the inputs/parameters?
LikeLike
Apparently now you need to write “@odata.type” in the compose (only one @).
LikeLike
Can i follow the same blog for adding check List items, Notes and attachments in a Planner Task?
Actually, my code is like for every loop I am trying to add all tasks like creating task adding due date, assignee,checklist itmes, Notes and attachment.
So please, help me if i can do this by this blog or how should i do?
Thanks a ton in Advance!
LikeLike
You probably could, I’m not sure. The attachments you can do with the standard planner connector: Update task details. Not sure about notes. Check the Graph API documentation; if it’s in there, it’ll be possible.
LikeLike
Dear all, I am trying to copy paste the JSON part for the response. But the setup assistant keeps telling me “Body is not valid JSON”. Of course I made sure to copy everything from { to }
It seems that the error is coming from the first line in the JSON code. If I remove this, the code is accepted… Any ideas?
LikeLike
It would certainly help to see your JSON code.
LikeLike
Try entering
{
“@odata.context”: “https://graph.microsoft.com/v1.0/$metadata#planner/tasks(‘XAPM7eOIe0ei64NAFnWP6mQAC-iP’)/details/$entity”,
“@odata.etag”: “W/\”JzEtVGFza0RldGFpbHMgQEBAQEBAQEBAQEBAQEBBTCc=\””,
“description”: “null”,
“previewType”: “description”,
“id”: “XAPM7eOIe0ei64NAFnWP6mQAC-iP”,
“references”: {},
“checklist”: {}
}
LikeLike
First of all thank you for taking the time to write this up and help others get it done! This will be a great help to my organization.
I keep running into an issue during Apply to Each 2 for the Update Planner Task Details where I get the error
“The execution of template action ‘Apply_to_each_2’ failed: the result of the evaluation of ‘foreach’ expression ‘@body(‘Get_Planner_Task_Details’)?[‘value’]’ is of type ‘Null’. The result must be a valid array.”
I have the array coded in as a variable higher in the Flow and am applying it to each as you showed.
Thank you for your help!
LikeLike
The input of your apply to each loop should be the array containing your checklist items; something like variables(‘MyCheckListItems’) if you’ve coded then into array variable earlier in the flow. The result being for every checklist item you want to add to the task there’s a corresponsing iteration of the loop, with Get Planner Task Details followed by an Update Planner Task Details inside. If you have multiple tasks you want to update with the same checklist items you might have an apply to each inside an apply to each, but otherwise you just need one loop.
LikeLike
Hi,
first of all: thanks for this great tutorial! It helped me a lot!
Some things I discovered, while setting this up:
1. In Azure I needed to choose a platform when I tried to setup the redirect URI. Choose web
2a. In your Screenshot, where you show the custom connector which adds the checklist item, there is the line: “orderHint”: “!”
This did not work for me (Power Automate). Deleting the whole line worked for me.
2b. I used “Initialize Variable” to define my checklist items. So my body for the custom update connector looks like this:
{
“checklist”: {
“@{guid()}”: {
“@{outputs(‘Compose’)}”: “microsoft.graph.plannerchecklistItem”,
“isChecked”: false,
“title”: “@{item()}”
}
}
}
the function “item()” takes the actual item (one of your checklist items) in a for each connector.
Maybe these infos help others. Thanks again for this tutorial!
LikeLike
Hi William, thank you sooooo much for posting this.
I am using this for an onboarding automation that has alot of branching, variables and timezone conversions so I was curious, is there a way to just put the json bit that exposes the checklist into the original update task action, instead of a subsequent? That would reduce my flow by 20 or more actions.
LikeLike
Yeah totally. I’m my example I just put the minimum into each iteration of the loop and then expose the checklist by setting the previewType attribute outside of the loop, but you can put it with the checklist item in a single hit and avoid that next stage.
LikeLike
I used the JSON code above for the response button (copy and pasted from above) and keep getting “Body is not valid JSON”.. any thoughts?
LikeLike
Sometimes the web browser changes characters like double quotes. Go to aka.ms/ge and get the sample data as described under that code snippet.
LikeLike
Hi there,
I’m glad this guide exists. I really don’t understand why Flow still can’t copy full Planner task details.
I’ve mostly got this working up to actually adding the checklists, but I’m kind of stumped at the final step of what content it uses to name the checklist items – and I may be overthinking my implementation. So before I waste too much time chasing the wrong solution, I was wondering if you could point me in the right direction?
I’m able to duplicate a template training bucket for onboarding new hires. I’m wanting each topic (Orientation, Day 1, Day 2, etc) to be its own task, which I’ve been able to do. Ideally, each task would have a checklist, but those checklist items would differ (Orientation has a set checklist, Day 1 has a different checklist, etc).
I’m assuming the best way to have those checklist items is to store them in a SharePoint list and then use Flow to get that list, compare the task title being created and modified (ex: Orientation) to the rows of data on that list, and then add each item if it matches up. So, if Orientation is the task that’s being created and updated, it would lookup that value and then add any items present to the new Orientation task on Planner.
But…I’m really having a hard time making sense of how to get to that point…Such as in “Select an output from previous steps” in the final screenshot, what would go there in this instance? And in the body of the code where you have “title”:”—–“, what would you have for that dynamic content value? I’m assuming this second one would have to be a value that is looked up, filtered, and incremented from the matched SharePoint list or column heading?
Thank you very very much! I’m still learning how to do more with Flow/Power Automate and feel like in some instances I end up overthinking this type of stuff.
LikeLike
You could have a SharePoint list with two columns, one for task title and one for checklist item. In the flow you can do Get items to get the list, then use the filter array action to filter it for a particular task title. You can do that for each task, so you have several filter array actions. Use the output of a filter array as the input of an apply to each, and the checklist title is the column with that data in. Alternatively you can have a separate SP list for each task and just use the Title column for the checklist title.
LikeLike
Hi there,
Thank you so much for the response. I started doing similar to what you suggested after submitting my first comment. I wasn’t too sure what exactly to compare when you mentioned the filter array action.
I ended up with an initial ‘Index’ list on SharePoint that describes the topics (titles for each Planner task, ex: Orientation, Topic 1, Topic 2, etc). I then created individual lists with list names that match exactly to each task’s name. In these lists, I added each item I wanted in the check lists for those tasks. I experimented a little with containing it to one list, but could not figure out how to use the task name in the first column, match it to the column name that matched the task, and iterate through the tasks I wanted. The multi-lists work for now.
The biggest part I struggled with during my first column and even with your input, was the “title”:”Variable” field in the custom Update Planner Task connector. What I realized was that since I had a few nested Apply to Each actions, the dynamic content item for my SharePoint-Get Items action was not listing all the normal variables, such as the column name ones. I realized this and had to manually type items(‘Apply_to_each_3’)?[‘Title’] as the variable to reference the apply to loop the custom connectors were in.
It works now though! I’m able to create a bucket that matches the name of a newly create person on one SharePoint list, Get Items of my ‘index’ list of task titles, create those tasks, and create the check list items for each of those tasks by Get Items from the SharePoint lists that match the title of the Create a Task.
I’m glad you created this tutorial. It’s been super helpful!! Hopefully some of my comment can help others. I’d post photos if I could. I saw Microsoft has an updated Planner Create Task action that’s supposed to be in public preview this month that allows for creating checklists. Hopefully that will be out soon to negate having to go through all of this needless work. I would have tested it but our org doesn’t have enough storage to create a new environment in the preview region unfortunately.
LikeLike
Glad you got it sorted. I didn’t know about the preview Planner action so I’ll see if I can find some info about that.
LikeLike
Yeah I just discovered it the other day after messing around with your tutorial. It’s really difficult to find for some reason. There’s documentation on Power Automate 2020 Release Wave 1 Plan here: https://docs.microsoft.com/en-us/power-platform-release-plan/2020wave1/ but the Planner update isn’t mentioned there. There’s a PDF linked on that page: https://go.microsoft.com/fwlink/?linkid=2116925
Page 176: Improvements in the Planner connector
With Microsoft Planner, users can easily bring together teams, tasks, documents, and
conversations for better results. The Planner connector enables makers and users to automate
important processes. In this release, users can now do much more with the Planner connector.
This includes support for adding, removing, or updating checklists in a task.
It says public preview September 2020 but doesn’t have a date for general availability. I’m not sure if it shows up in the Preview (United States) region currently. It’s still surprising the capability isn’t already available.
LikeLike
In case anyone stumbles upon my mention of the Planner connector changes. I just checked the links I originally posted. The 2020 Release Wave 1 Plan PDF linked on that page no longer mentions what I said at all. Looking at the current 2020 Release Wave 2 Plan PDF also doesn’t have any mention of it. The cached site description on a Google search still shows mention of the change for https://docs.microsoft.com/en-us/power-platform-release-plan/2020wave1/cdm-data-integration/planned-features still shows mention of the checklists. And a user comment from https://powerusers.microsoft.com/t5/Power-Automate-Ideas/Include-Checklist-Within-Planner-Task-When-Created-in-Flow/idi-p/36367/page/14#comments mentions it.
But it’s gone from the page now. Very strange. This has been a very basic requested feature for years now. It’s crazy that Microsoft hasn’t implemented it or given any real updates so far.
LikeLike
Interesting observation. It wouldn’t be the first time Microsoft have dropped a planned feature as quietly as they announced it. I can’t think of any technical reason why it wouldn’t be possible to have this in the standard connector so I assume they just haven’t prioritised it in this release.
LikeLike
I’ve updated this blog article to show that this feature has now been published.
LikeLike
Hi,
I only want to read the details from planner like : Priority, Completed Checklist Items, Checklist Items and Labels.
For this, i followed the above steps, but I am getting 403 error :
{
“error”: {
“code”: “”,
“message”: “You do not have the required permissions to access this item.”,
“innerError”: {
“date”: “2020-11-18T09:28:58”,
“request-id”: “0a2cac4d-a74d-4e75-bb0c-a852aa04c274”,
“client-request-id”: “0a2cac4d-a74d-4e75-bb0c-a852aa04c274”
}
}
}
Here, I have User.Read Permission in the API. Do I need to have Group.ReadWrite.All permission for reading as well. I assumed that this is required only if one wants to update the Planner data via API and not for reading.
Please advise.
LikeLike
You will need Group.Read.All
LikeLike
Hello, I added Group.Read.All permission and made sure to grant admin consent but I’m still getting 403 – You do not have the required permissions to access this item. Any ideas?
LikeLike
Have you used Application or Delegated permission?
LikeLike
I used delegated permission
LikeLike
Not sure then, you can try ReadWrite.All but if that doesn’t work, talk to your Azure AD administrator.
LikeLike
I’m one of the admins LOL.
I figured it out. It was a replication issue on permissions, I walked out from my desk somewhat frustrated and went for a drive. When I came back the test started running. I often forget about replication. So hopefully anyone struggling finds this useful.
Thanks for the guide BTW! This is a fine addition to the Power apps community.
LikeLike
I’m the Admin LOL.
I figured it out. I went for a walk, came back to my desk and realized that my was a replication issue with permission, it just took a while for permissions to kick in.
I was able to test the connector successfully.
I’m facing a different dilemma now… I have 3 items created on a sharepoint list as test checklist items: ChecklistItem1, CheckListItem2 and CheckListItem3.
I already called the get items action on my flow and added an apply to each condition, then called the custom connector actions, my problem is on the “Update task details” action, I’m getting the following response:
{
“error”: {
“code”: “”,
“message”: “The request is invalid:\r\nValue cannot be null.\r\nParameter name: qualifiedName”,
“innerError”: {
“date”: “2020-11-19T17:55:13”,
“request-id”: “ab2f122a-af3f-47cc-9b61-bd70877dd303”,
“client-request-id”: “ab2f122a-af3f-47cc-9b61-bd70877dd303”
}
}
}
I’m an admin, but my forte is not on json, any ideas what I may be doing wrong?
LikeLike
What does your request body look like in the Update task details action? Either copy and paste or post an screen shot.
LikeLike
Hey, so after a few minutes I ended up just changing “@@odata.type” to “@odata.type” and my flow worked like a charm.
Thing is I just realized this was for nothing since Planner only allows 20 checkboxes per tasks. My organization needs several more.
For now I’ll be scrapping all my progress and looking for alternatives.
Planner is really lacking to be completely honest.
LikeLike